Limit test participation to specific candidates on AutoProctor using link distribution, email restrictions, unique invitation links, or platform access controls.
By default, anyone with your test link can take the test. AutoProctor gives you several methods to lock down access so only the candidates you choose can participate.
Use AutoProctor’s built-in Login restrictions to allow only specific email domains or individual email addresses. You configure this in the Access & login section of the test’s Settings.
1
Open the Access & login Section
Go to your Tests page, click Settings next to the test, and choose Access & login from the list of sections.
2
Enter Login Restrictions
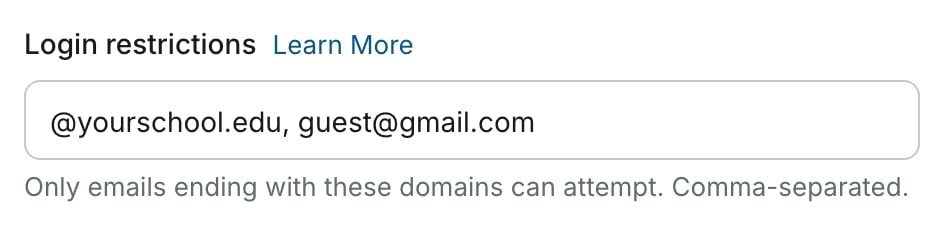
In Login restrictions, add the email domains (e.g., @yourschool.edu) or specific email addresses you want to allow, separated by commas.
3
Save
Click Save settings.
Login restrictions limiting the test to one school domain and one guest address
Generate unique per-candidate URLs tied to specific email addresses. Each candidate receives their own link with email verification, so only the intended recipient can use it.
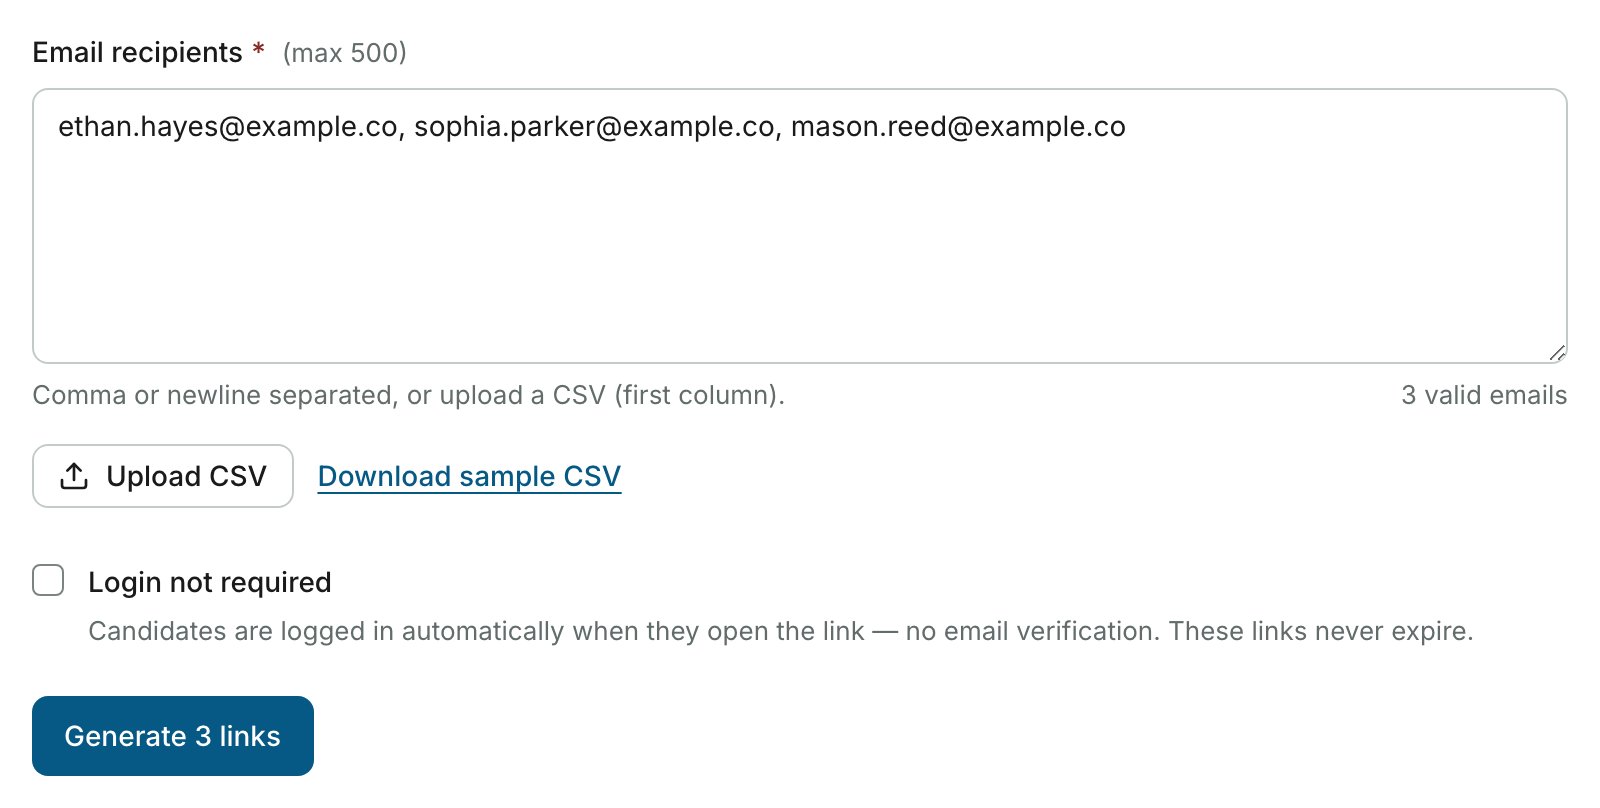
Three email addresses entered on the Generate tab of Unique test URLs
1
Turn On Unique Test URLs
In the Access & login section of the test’s Settings, turn on Unique test URLs and click Save settings.
2
Open the Unique Test URLs Page
Click Generate unique links under the switch.
3
Add email addresses
On the Generate tab, type or paste the candidate email addresses, or click Upload CSV (up to 500 at once).
4
Generate the unique links
Click Generate links. AutoProctor creates a unique link for each email address and lists them on the Links tab.
5
Distribute unique links
On the Links tab, click Copy link next to a candidate, or click Export to download all the links as a CSV file. Send each candidate their unique link individually.
Unique invitation links are available only on the Elite Plan and work with Socratease Quizzes and IFrame Tests. See Payments and Credits for plan details.
If you use Google Forms, you can restrict access at the Google Forms level instead of (or in addition to) AutoProctor restrictions. Candidates can still open the AutoProctor link, but they cannot proceed if Google Forms blocks their access.
1
Open your Google Form settings
In Google Forms, click the Settings gear icon.
2
Restrict to your organization
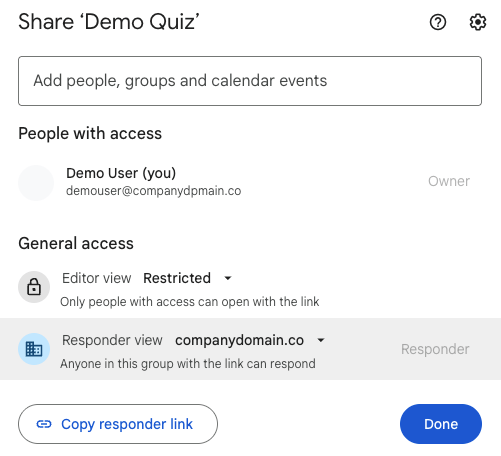
Enable the option to restrict responses to users in your organization. This limits access to candidates with email addresses under your Google Workspace domain.
{"docsConfig":{"theme":"maple","$schema":"https://mintlify.com/docs.json","name":"AutoProctor Help Center","colors":{"primary":"#1f398a","light":"#5dbd84","dark":"#1f398a"},"logo":{"light":"https://mintcdn.com/autoproctor/W-xf3W76sMq0h8jF/logo/light.svg?fit=max\u0026auto=format\u0026n=W-xf3W76sMq0h8jF\u0026q=85\u0026s=3e6e1b165ff9dcf79c4a97b161c4a116","dark":"https://mintcdn.com/autoproctor/W-xf3W76sMq0h8jF/logo/dark.svg?fit=max\u0026auto=format\u0026n=W-xf3W76sMq0h8jF\u0026q=85\u0026s=4998e30d272cd83fe55c7780bd016cd5","href":"/"},"favicon":"https://mintcdn.com/autoproctor/ppA8ifNdbhTkKwqD/favicon.svg?fit=max\u0026auto=format\u0026n=ppA8ifNdbhTkKwqD\u0026q=85\u0026s=c12901c16b16ea6e6467434d2e38e71f","appearance":{"default":"light","strict":true},"background":{"decoration":"grid"},"navbar":{},"footer":{"socials":{"website":"https://www.autoproctor.co/","linkedin":"https://www.linkedin.com/company/autoproctorhq","youtube":"https://www.youtube.com/@autoproctor1043"}},"seo":{"metatags":{"og:site_name":"AutoProctor Help Center"}},"integrations":{"telemetry":{"enabled":true}},"styling":{"latex":false},"navigation":{"global":{},"languages":[{"language":"en","default":true,"href":"create-proctored-exam"},{"language":"es","href":"es/create-proctored-exam"},{"language":"pt","href":"pt/create-proctored-exam"}]}},"deployment":{"deploymentMetadataValue":{"subdomain":"autoproctor","hasAudioNarration":false,"actualSubdomain":"autoproctor","customDomains":["help.autoproctor.co"],"gitSource":{"type":"github","owner":"socrateasehq","repo":"autoproctor-mintlify-docs","deployBranch":"main","contentDirectory":"","isPrivate":true,"mountPath":"","label":""},"chroma":{"liveDeploymentHistoryId":"6ace3fe0d480d6cbf574dab2","collectionId":"b60ac5bf-03c9-4ba4-963c-777a76776736","schemaVersion":"v3","latestBuiltDeploymentHistoryId":"6ace3fe0d480d6cbf574dab2"},"feedback":{"thumbs":true},"entitlements":{},"buildId":"6ace3fe0d480d6cbf574dab2","clientVersion":"0.0.3939","searchFilterCounts":[{"language":"en","tag":"Tests \u0026 Results","count":34},{"language":"es","tag":"Exámenes y Resultados","count":34},{"language":"pt","tag":"Testes e Resultados","count":34},{"language":"en","tag":"Issues","count":14},{"language":"es","tag":"Problemas","count":14},{"language":"pt","tag":"Problemas","count":14},{"language":"en","tag":"Create","count":12},{"language":"en","tag":"Candidate Guide","count":12},{"language":"en","tag":"Pricing \u0026 Account","count":12},{"language":"en","tag":"Socratease Quizzes","count":12},{"language":"es","tag":"Crear","count":12},{"language":"es","tag":"Guía del Candidato","count":12},{"language":"es","tag":"Precios y Cuenta","count":12},{"language":"es","tag":"Cuestionarios Socratease","count":12},{"language":"pt","tag":"Criar","count":12},{"language":"pt","tag":"Guia do Candidato","count":12},{"language":"pt","tag":"Preços e Conta","count":12},{"language":"pt","tag":"Questionários Socratease","count":12},{"language":"en","tag":"Results","count":7},{"language":"en","tag":"Understanding AutoProctor","count":7},{"language":"en","tag":"Attempting Tests","count":7},{"language":"en","tag":"Create \u0026 Questions","count":7},{"language":"es","tag":"Resultados","count":7},{"language":"es","tag":"Conociendo AutoProctor","count":7},{"language":"es","tag":"Intentar Exámenes","count":7},{"language":"es","tag":"Crear y Preguntas","count":7},{"language":"pt","tag":"Resultados","count":7},{"language":"pt","tag":"Conhecendo o AutoProctor","count":7},{"language":"pt","tag":"Realizando Testes","count":7},{"language":"pt","tag":"Criar e Perguntas","count":7}]},"assistantConfig":{"enableAskAiButton":false,"enableStarterQuestions":false,"enableContextualStarterQuestions":false,"enableAskAiSearchBar":true},"hasChatPermissions":false,"hasWebMcpPermissions":false,"toggles":[{"name":"kill-isr","enabled":true,"variant":{"name":"disabled","enabled":false,"feature_enabled":true},"impressionData":false},{"name":"agent-mintlify-slack","enabled":true,"variant":{"name":"disabled","enabled":false,"feature_enabled":true},"impressionData":false},{"name":"editor-v7-file-tree","enabled":true,"variant":{"name":"disabled","enabled":false,"feature_enabled":true},"impressionData":false},{"name":"agent-integrations-settings","enabled":true,"variant":{"name":"disabled","enabled":false,"feature_enabled":true},"impressionData":false},{"name":"automations-pr-grouping","enabled":true,"variant":{"name":"disabled","enabled":false,"feature_enabled":true},"impressionData":false},{"name":"custom-prefix","enabled":true,"variant":{"name":"disabled","enabled":false,"feature_enabled":true},"impressionData":false},{"name":"analytics-v7","enabled":true,"variant":{"name":"disabled","enabled":false,"feature_enabled":true},"impressionData":false},{"name":"user-flows-analytics","enabled":true,"variant":{"name":"disabled","enabled":false,"feature_enabled":true},"impressionData":false},{"name":"no-publish-flow","enabled":true,"variant":{"name":"disabled","enabled":false,"feature_enabled":true},"impressionData":false},{"name":"workos-onboarding","enabled":true,"variant":{"name":"disabled","enabled":false,"feature_enabled":true},"impressionData":false},{"name":"llms-txt-v2","enabled":true,"variant":{"name":"disabled","enabled":false,"feature_enabled":true},"impressionData":false},{"name":"pause-universal-search-reconcile","enabled":true,"variant":{"name":"disabled","enabled":false,"feature_enabled":true},"impressionData":false},{"name":"snapshot-serving-live","enabled":true,"variant":{"name":"disabled","enabled":false,"feature_enabled":true},"impressionData":false},{"name":"stripTemperatureMiddleware","enabled":true,"variant":{"name":"disabled","enabled":false,"feature_enabled":true},"impressionData":false},{"name":"per-site-search-delta","enabled":true,"variant":{"name":"disabled","enabled":false,"feature_enabled":true},"impressionData":false},{"name":"support-platform-pylon-zendesk","enabled":true,"variant":{"name":"disabled","enabled":false,"feature_enabled":true},"impressionData":false},{"name":"snapshot-serving","enabled":true,"variant":{"name":"disabled","enabled":false,"feature_enabled":true},"impressionData":false},{"name":"instant-rollback","enabled":true,"variant":{"name":"disabled","enabled":false,"feature_enabled":true},"impressionData":false},{"name":"granular-notifications-server","enabled":true,"variant":{"name":"disabled","enabled":false,"feature_enabled":true},"impressionData":false},{"name":"granular-notifications","enabled":true,"variant":{"name":"disabled","enabled":false,"feature_enabled":true},"impressionData":false},{"name":"editor-private-page-search","enabled":true,"variant":{"name":"disabled","enabled":false,"feature_enabled":true},"impressionData":false},{"name":"automations-fable","enabled":true,"variant":{"name":"disabled","enabled":false,"feature_enabled":true},"impressionData":false},{"name":"fixed-ai-action-pricing","enabled":true,"variant":{"name":"disabled","enabled":false,"feature_enabled":true},"impressionData":false},{"name":"automation-resolve-merge-conflict","enabled":true,"variant":{"name":"disabled","enabled":false,"feature_enabled":true},"impressionData":false},{"name":"scoped-publishing","enabled":true,"variant":{"name":"disabled","enabled":false,"feature_enabled":true},"impressionData":false},{"name":"mintql","enabled":true,"variant":{"name":"disabled","enabled":false,"feature_enabled":true},"impressionData":false},{"name":"page-level-analytics","enabled":true,"variant":{"name":"disabled","enabled":false,"feature_enabled":true},"impressionData":false},{"name":"editor-version-history-v2","enabled":true,"variant":{"name":"disabled","enabled":false,"feature_enabled":true},"impressionData":false},{"name":"editor-nav-generations","enabled":true,"variant":{"name":"disabled","enabled":false,"feature_enabled":true},"impressionData":false},{"name":"billing-page-v2","enabled":true,"variant":{"name":"disabled","enabled":false,"feature_enabled":true},"impressionData":false},{"name":"workspace-projects","enabled":true,"variant":{"name":"disabled","enabled":false,"feature_enabled":true},"impressionData":false},{"name":"assistant-v5","enabled":true,"variant":{"name":"disabled","enabled":false,"feature_enabled":true},"impressionData":false},{"name":"byok-sep-25","enabled":true,"variant":{"name":"disabled","enabled":false,"feature_enabled":true},"impressionData":false},{"name":"fork-pr-previews","enabled":true,"variant":{"name":"disabled","enabled":false,"feature_enabled":true},"impressionData":false},{"name":"revalidation-jwt","enabled":true,"variant":{"name":"disabled","enabled":false,"feature_enabled":true},"impressionData":false},{"name":"vite-origin","enabled":true,"variant":{"name":"disabled","enabled":false,"feature_enabled":true},"impressionData":false},{"name":"editor-agent-model-picker","enabled":true,"variant":{"name":"disabled","enabled":false,"feature_enabled":true},"impressionData":false},{"name":"billing-updated-9-15","enabled":true,"variant":{"name":"disabled","enabled":false,"feature_enabled":true},"impressionData":false},{"name":"hobby-abuse-scan","enabled":true,"variant":{"name":"disabled","enabled":false,"feature_enabled":true},"impressionData":false},{"name":"dashboard-inbox","enabled":true,"variant":{"name":"disabled","enabled":false,"feature_enabled":true},"impressionData":false}],"isAtlas":false,"googleFontsInlined":false},"customCss":[{"filePath":"custom.css","content":".eyebrow,footer a[href*=\"mintlify.com\"],nav[aria-label=Pages]>ul{display:none!important}#content-area{max-width:64rem;container-type:inline-size}@media (min-width:1024px){.lg\\:ml-\\[19rem\\]{padding-left:3rem!important;padding-right:2rem!important}}#content-area h2{margin-top:1.5rem}#content-area h3{padding-left:.75rem;border-left:2px solid #d1d5db}#content.mdx-content{margin-top:1rem}main .mt-2.text-lg.prose,main [role=banner]>div.prose,main header>div.prose{color:#9ca3af!important;font-weight:400;font-size:1.125rem;line-height:1.6;margin-bottom:.5rem}img.nav-logo{height:2rem!important}.custom-sidebar-icons{flex-shrink:0}#content-area a.link{color:#2563eb;text-decoration-color:#2563eb;border-bottom-color:#2563eb}#content-area a.link:hover{color:#1d4ed8}#related-resources{margin-top:3.5rem;padding-top:1.5rem;border-top:1px solid #e5e7eb;font-size:.95rem;color:#6b7280}#related-resources+ul{color:#6b7280;font-size:.9rem}#content-area .frame{width:fit-content;max-width:100%;min-width:200px;margin-left:auto;margin-right:auto}#content-area .frame img,#content-area .frame video{max-width:70cqi;height:auto;display:block}#content-area .frame iframe{width:70cqi;display:block}#sidebar-content>div.mt-6{margin-top:1rem;display:flex;justify-content:center}"}],"page":{"pagePath":"restrict-access-to-candidates","slug":"/restrict-access-to-candidates","pageMetadata":{"title":"Restrict Test Access to Specific Candidates","description":"Limit test participation to specific candidates on AutoProctor using link distribution, email restrictions, unique invitation links, or platform access controls.","href":"/restrict-access-to-candidates"},"description":{"compiledSource":"\"use strict\";\nconst {jsx: _jsx} = arguments[0];\nconst {useMDXComponents: _provideComponents} = arguments[0];\nfunction _createMdxContent(props) {\n const _components = {\n p: \"p\",\n ..._provideComponents(),\n ...props.components\n };\n return _jsx(_components.p, {\n children: \"Limit test participation to specific candidates on AutoProctor using link distribution, email restrictions, unique invitation links, or platform access controls.\"\n });\n}\nfunction MDXContent(props = {}) {\n const {wrapper: MDXLayout} = {\n ..._provideComponents(),\n ...props.components\n };\n return MDXLayout ? _jsx(MDXLayout, {\n ...props,\n children: _jsx(_createMdxContent, {\n ...props\n })\n }) : _createMdxContent(props);\n}\nreturn {\n default: MDXContent\n};\n","frontmatter":{},"scope":{}},"pageType":"default","mdx":{"mdxSource":{"compiledSource":"\"use strict\";const{Fragment:_Fragment,jsx:_jsx,jsxs:_jsxs}=arguments[0];const{useMDXComponents:_provideComponents}=arguments[0];function _createMdxContent(props){const _components={a:`a`,code:`code`,li:`li`,p:`p`,strong:`strong`,tbody:`tbody`,td:`td`,th:`th`,thead:`thead`,tr:`tr`,ul:`ul`,..._provideComponents(),...props.components},{Frame,Heading,Note,OptimizedImage,Step,Steps,Table}=_components;if(!Frame)_missingMdxReference(`Frame`,true);if(!Heading)_missingMdxReference(`Heading`,true);if(!Note)_missingMdxReference(`Note`,true);if(!OptimizedImage)_missingMdxReference(`OptimizedImage`,true);if(!Step)_missingMdxReference(`Step`,true);if(!Steps)_missingMdxReference(`Steps`,true);if(!Table)_missingMdxReference(`Table`,true);return _jsxs(_Fragment,{children:[_jsx(_components.p,{children:`By default, anyone with your test link can take the test. AutoProctor gives you several methods to lock down access so only the candidates you choose can participate.`}),`\n`,_jsx(Heading,{level:`2`,id:`method-1-selective-link-distribution`,children:`Method 1: Selective Link Distribution`}),`\n`,_jsx(_components.p,{children:`The simplest approach is to share the test link only with the candidates who should take the test.`}),`\n`,_jsxs(Steps,{children:[_jsx(Step,{title:`Identify eligible candidates`,children:_jsx(_components.p,{children:`Determine which candidates should have access to the test.`})}),_jsx(Step,{title:`Share the link privately`,children:_jsx(_components.p,{children:`Send the test link only to those candidates via email, your learning management system, or another private channel. Avoid posting the link publicly.`})})]}),`\n`,_jsx(Note,{children:_jsx(_components.p,{children:`This method relies on candidates not sharing the link with others. If you need stronger access control, use one of the methods below.`})}),`\n`,_jsx(Heading,{level:`2`,id:`method-2-email-based-restrictions`,children:`Method 2: Email-Based Restrictions`}),`\n`,_jsxs(_components.p,{children:[`Use AutoProctor’s built-in `,_jsx(_components.strong,{children:`Login restrictions`}),` to allow only specific email domains or individual email addresses. You configure this in the `,_jsx(_components.strong,{children:`Access \u0026 login`}),` section of the test’s `,_jsx(_components.strong,{children:`Settings`}),`.`]}),`\n`,_jsxs(Steps,{children:[_jsx(Step,{title:`Open the Access \u0026 login Section`,children:_jsxs(_components.p,{children:[`Go to your `,_jsx(_components.a,{href:`https://www.autoproctor.co/test-admin/home/`,children:_jsx(_components.strong,{children:`Tests`})}),` page, click `,_jsx(_components.strong,{children:`Settings`}),` next to the test, and choose `,_jsx(_components.strong,{children:`Access \u0026 login`}),` from the list of sections.`]})}),_jsx(Step,{title:`Enter Login Restrictions`,children:_jsxs(_components.p,{children:[`In `,_jsx(_components.strong,{children:`Login restrictions`}),`, add the email domains (e.g., `,_jsx(_components.code,{children:`@yourschool.edu`}),`) or specific email addresses you want to allow, separated by commas.`]})}),_jsx(Step,{title:`Save`,children:_jsxs(_components.p,{children:[`Click `,_jsx(_components.strong,{children:`Save settings`}),`.`]})})]}),`\n`,_jsx(Frame,{caption:`Login restrictions limiting the test to one school domain and one guest address`,children:_jsx(OptimizedImage,{src:`https://mintcdn.com/autoproctor/4bsvsaJCp4E0AK7P/images/restrict-access-to-candidates/login-restrictions-school.png?fit=max\u0026auto=format\u0026n=4bsvsaJCp4E0AK7P\u0026q=85\u0026s=42c6d85c488faa75111666150f44f222`,alt:`Login restrictions field containing @yourschool.edu, guest@gmail.com, with the hint Only emails ending with these domains can attempt. Comma-separated`,\"data-og-width\":`944`,width:`944`,\"data-og-height\":`228`,height:`228`,\"data-path\":`images/restrict-access-to-candidates/login-restrictions-school.png`,\"data-optimize\":`true`,\"data-opv\":`3`,srcset:`https://mintcdn.com/autoproctor/4bsvsaJCp4E0AK7P/images/restrict-access-to-candidates/login-restrictions-school.png?w=280\u0026fit=max\u0026auto=format\u0026n=4bsvsaJCp4E0AK7P\u0026q=85\u0026s=8bc174ea89e3fd025825b5dfecf80e10 280w, https://mintcdn.com/autoproctor/4bsvsaJCp4E0AK7P/images/restrict-access-to-candidates/login-restrictions-school.png?w=560\u0026fit=max\u0026auto=format\u0026n=4bsvsaJCp4E0AK7P\u0026q=85\u0026s=0b050c96e1b3fc996c2edafabb7ab15d 560w, https://mintcdn.com/autoproctor/4bsvsaJCp4E0AK7P/images/restrict-access-to-candidates/login-restrictions-school.png?w=840\u0026fit=max\u0026auto=format\u0026n=4bsvsaJCp4E0AK7P\u0026q=85\u0026s=677447e7e67a5c6ee15ace6f5743c5fd 840w, https://mintcdn.com/autoproctor/4bsvsaJCp4E0AK7P/images/restrict-access-to-candidates/login-restrictions-school.png?w=1100\u0026fit=max\u0026auto=format\u0026n=4bsvsaJCp4E0AK7P\u0026q=85\u0026s=a655666f9e3ee65efafea3d5ffbaee50 1100w, https://mintcdn.com/autoproctor/4bsvsaJCp4E0AK7P/images/restrict-access-to-candidates/login-restrictions-school.png?w=1650\u0026fit=max\u0026auto=format\u0026n=4bsvsaJCp4E0AK7P\u0026q=85\u0026s=b6574f425f6eac50c578eb9f162d3f2f 1650w, https://mintcdn.com/autoproctor/4bsvsaJCp4E0AK7P/images/restrict-access-to-candidates/login-restrictions-school.png?w=2500\u0026fit=max\u0026auto=format\u0026n=4bsvsaJCp4E0AK7P\u0026q=85\u0026s=d13a6e712a6597e5afef529a82347e8f 2500w`})}),`\n`,_jsxs(_components.p,{children:[`See `,_jsx(_components.a,{href:`/restrict-access-by-email`,children:`Restrict Test Access by Email Address`}),` for full setup instructions and examples.`]}),`\n`,_jsx(Heading,{level:`2`,id:`method-3-unique-invitation-links`,children:`Method 3: Unique Invitation Links`}),`\n`,_jsx(_components.p,{children:`Generate unique per-candidate URLs tied to specific email addresses. Each candidate receives their own link with email verification, so only the intended recipient can use it.`}),`\n`,_jsx(Frame,{caption:`Three email addresses entered on the Generate tab of Unique test URLs`,children:_jsx(OptimizedImage,{src:`https://mintcdn.com/autoproctor/4bsvsaJCp4E0AK7P/images/restrict-access-to-candidates/generate-unique-links.png?fit=max\u0026auto=format\u0026n=4bsvsaJCp4E0AK7P\u0026q=85\u0026s=5293f6ce76a01d78d933af531edd6803`,alt:`Email recipients box holding three email addresses, with an Upload CSV button, a Download sample CSV link, an unticked Login not required checkbox and a Generate 3 links button`,\"data-og-width\":`1600`,width:`1600`,\"data-og-height\":`808`,height:`808`,\"data-path\":`images/restrict-access-to-candidates/generate-unique-links.png`,\"data-optimize\":`true`,\"data-opv\":`3`,srcset:`https://mintcdn.com/autoproctor/4bsvsaJCp4E0AK7P/images/restrict-access-to-candidates/generate-unique-links.png?w=280\u0026fit=max\u0026auto=format\u0026n=4bsvsaJCp4E0AK7P\u0026q=85\u0026s=7db51cd0b6ed76f478440d9ca645646d 280w, https://mintcdn.com/autoproctor/4bsvsaJCp4E0AK7P/images/restrict-access-to-candidates/generate-unique-links.png?w=560\u0026fit=max\u0026auto=format\u0026n=4bsvsaJCp4E0AK7P\u0026q=85\u0026s=ead0d70c033e622533636d8e465964e7 560w, https://mintcdn.com/autoproctor/4bsvsaJCp4E0AK7P/images/restrict-access-to-candidates/generate-unique-links.png?w=840\u0026fit=max\u0026auto=format\u0026n=4bsvsaJCp4E0AK7P\u0026q=85\u0026s=4faaafa6ed33f3acf747d9d78e0c9320 840w, https://mintcdn.com/autoproctor/4bsvsaJCp4E0AK7P/images/restrict-access-to-candidates/generate-unique-links.png?w=1100\u0026fit=max\u0026auto=format\u0026n=4bsvsaJCp4E0AK7P\u0026q=85\u0026s=3b2c5d0c31584d7050daf01524e32185 1100w, https://mintcdn.com/autoproctor/4bsvsaJCp4E0AK7P/images/restrict-access-to-candidates/generate-unique-links.png?w=1650\u0026fit=max\u0026auto=format\u0026n=4bsvsaJCp4E0AK7P\u0026q=85\u0026s=34a37b7ecd757cc892e13360d3668a86 1650w, https://mintcdn.com/autoproctor/4bsvsaJCp4E0AK7P/images/restrict-access-to-candidates/generate-unique-links.png?w=2500\u0026fit=max\u0026auto=format\u0026n=4bsvsaJCp4E0AK7P\u0026q=85\u0026s=c2ce7d441857eb51b551ed38b3b3c1bc 2500w`})}),`\n`,_jsxs(Steps,{children:[_jsx(Step,{title:`Turn On Unique Test URLs`,children:_jsxs(_components.p,{children:[`In the `,_jsx(_components.strong,{children:`Access \u0026 login`}),` section of the test’s `,_jsx(_components.strong,{children:`Settings`}),`, turn on `,_jsx(_components.strong,{children:`Unique test URLs`}),` and click `,_jsx(_components.strong,{children:`Save settings`}),`.`]})}),_jsx(Step,{title:`Open the Unique Test URLs Page`,children:_jsxs(_components.p,{children:[`Click `,_jsx(_components.strong,{children:`Generate unique links`}),` under the switch.`]})}),_jsx(Step,{title:`Add email addresses`,children:_jsxs(_components.p,{children:[`On the `,_jsx(_components.strong,{children:`Generate`}),` tab, type or paste the candidate email addresses, or click `,_jsx(_components.strong,{children:`Upload CSV`}),` (up to 500 at once).`]})}),_jsx(Step,{title:`Generate the unique links`,children:_jsxs(_components.p,{children:[`Click `,_jsx(_components.strong,{children:`Generate links`}),`. AutoProctor creates a unique link for each email address and lists them on the `,_jsx(_components.strong,{children:`Links`}),` tab.`]})}),_jsx(Step,{title:`Distribute unique links`,children:_jsxs(_components.p,{children:[`On the `,_jsx(_components.strong,{children:`Links`}),` tab, click `,_jsx(_components.strong,{children:`Copy link`}),` next to a candidate, or click `,_jsx(_components.strong,{children:`Export`}),` to download all the links as a CSV file. Send each candidate their unique link individually.`]})})]}),`\n`,_jsx(Note,{children:_jsxs(_components.p,{children:[`Unique invitation links are available only on the `,_jsx(_components.strong,{children:`Elite Plan`}),` and work with Socratease Quizzes and IFrame Tests. See `,_jsx(_components.a,{href:`/payments-and-credits`,children:`Payments and Credits`}),` for plan details.`]})}),`\n`,_jsxs(_components.p,{children:[`See `,_jsx(_components.a,{href:`/invite-candidates-via-email`,children:`Inviting Candidates via Email`}),` for the complete setup process.`]}),`\n`,_jsx(Heading,{level:`2`,id:`method-4-google-forms-access-restrictions`,children:`Method 4: Google Forms Access Restrictions`}),`\n`,_jsx(_components.p,{children:`If you use Google Forms, you can restrict access at the Google Forms level instead of (or in addition to) AutoProctor restrictions. Candidates can still open the AutoProctor link, but they cannot proceed if Google Forms blocks their access.`}),`\n`,_jsxs(Steps,{children:[_jsx(Step,{title:`Open your Google Form settings`,children:_jsxs(_components.p,{children:[`In Google Forms, click the `,_jsx(_components.strong,{children:`Settings`}),` gear icon.`]})}),_jsxs(Step,{title:`Restrict to your organization`,children:[_jsx(_components.p,{children:`Enable the option to restrict responses to users in your organization. This limits access to candidates with email addresses under your Google Workspace domain.`}),_jsx(Frame,{caption:`Google Forms access restriction settings`,children:_jsx(OptimizedImage,{src:`https://mintcdn.com/autoproctor/ohxrvFS9oMuRxUUX/images/settings/google-form-restriction.png?fit=max\u0026auto=format\u0026n=ohxrvFS9oMuRxUUX\u0026q=85\u0026s=e51dbb9bfbc0c4ee57357e954ff8dc88`,alt:`Google Forms access restriction settings`,\"data-og-width\":`501`,width:`501`,\"data-og-height\":`456`,height:`456`,\"data-path\":`images/settings/google-form-restriction.png`,\"data-optimize\":`true`,\"data-opv\":`3`,srcset:`https://mintcdn.com/autoproctor/ohxrvFS9oMuRxUUX/images/settings/google-form-restriction.png?w=280\u0026fit=max\u0026auto=format\u0026n=ohxrvFS9oMuRxUUX\u0026q=85\u0026s=74b1684a0347bec5414a281d5aceb07d 280w, https://mintcdn.com/autoproctor/ohxrvFS9oMuRxUUX/images/settings/google-form-restriction.png?w=560\u0026fit=max\u0026auto=format\u0026n=ohxrvFS9oMuRxUUX\u0026q=85\u0026s=7e0bce8b14312d41e0f382822dc793fa 560w, https://mintcdn.com/autoproctor/ohxrvFS9oMuRxUUX/images/settings/google-form-restriction.png?w=840\u0026fit=max\u0026auto=format\u0026n=ohxrvFS9oMuRxUUX\u0026q=85\u0026s=3fc579761d8aaf3bc2dcea82f7fdbfc4 840w, https://mintcdn.com/autoproctor/ohxrvFS9oMuRxUUX/images/settings/google-form-restriction.png?w=1100\u0026fit=max\u0026auto=format\u0026n=ohxrvFS9oMuRxUUX\u0026q=85\u0026s=259ebceaa0147a7bf0a70a1ebb5aac5e 1100w, https://mintcdn.com/autoproctor/ohxrvFS9oMuRxUUX/images/settings/google-form-restriction.png?w=1650\u0026fit=max\u0026auto=format\u0026n=ohxrvFS9oMuRxUUX\u0026q=85\u0026s=4e2e9ac2e187e7216ccb0ce39b2c99e0 1650w, https://mintcdn.com/autoproctor/ohxrvFS9oMuRxUUX/images/settings/google-form-restriction.png?w=2500\u0026fit=max\u0026auto=format\u0026n=ohxrvFS9oMuRxUUX\u0026q=85\u0026s=9e52e9f9e81b21ff71841c7d1db34816 2500w`})})]})]}),`\n`,_jsxs(_components.p,{children:[`For more details, refer to `,_jsx(_components.a,{href:`https://www.bettercloud.com/monitor/the-academy/restrict-access-to-google-forms/`,children:`Google’s guide on restricting form access`}),`.`]}),`\n`,_jsx(Heading,{level:`2`,id:`comparison-of-access-control-methods`,children:`Comparison of Access Control Methods`}),`\n`,_jsxs(Table,{children:[_jsx(_components.thead,{children:_jsxs(_components.tr,{children:[_jsx(_components.th,{children:`Method`}),_jsx(_components.th,{children:`Strength`}),_jsx(_components.th,{children:`Works With`}),_jsx(_components.th,{children:`Plan Required`})]})}),_jsxs(_components.tbody,{children:[_jsxs(_components.tr,{children:[_jsx(_components.td,{children:`Selective link distribution`}),_jsx(_components.td,{children:`Low, relies on trust`}),_jsx(_components.td,{children:`All test types`}),_jsx(_components.td,{children:`Any`})]}),_jsxs(_components.tr,{children:[_jsx(_components.td,{children:`Email-based restrictions`}),_jsx(_components.td,{children:`Medium, blocks wrong domains`}),_jsx(_components.td,{children:`All test types`}),_jsx(_components.td,{children:`Any`})]}),_jsxs(_components.tr,{children:[_jsx(_components.td,{children:`Unique invitation links`}),_jsx(_components.td,{children:`High, per-candidate verification`}),_jsx(_components.td,{children:`Socratease Quizzes, IFrame Tests`}),_jsx(_components.td,{children:`Elite`})]}),_jsxs(_components.tr,{children:[_jsx(_components.td,{children:`Google Forms restrictions`}),_jsx(_components.td,{children:`Medium, organization-level`}),_jsx(_components.td,{children:`Google Forms only`}),_jsx(_components.td,{children:`Any`})]})]})]}),`\n`,_jsx(Heading,{level:`2`,id:`related-resources`,children:`Related Resources`}),`\n`,_jsxs(_components.ul,{children:[`\n`,_jsxs(_components.li,{children:[_jsx(_components.a,{href:`/restrict-access-by-email`,children:`Restrict Test Access by Email Address`}),` - Set up domain and email-based restrictions`]}),`\n`,_jsxs(_components.li,{children:[_jsx(_components.a,{href:`/invite-candidates-via-email`,children:`Inviting Candidates via Email`}),` - Generate unique per-candidate test links`]}),`\n`,_jsxs(_components.li,{children:[_jsx(_components.a,{href:`/candidate-login-methods`,children:`Candidate Login Methods`}),` - Understand available authentication options`]}),`\n`,_jsxs(_components.li,{children:[_jsx(_components.a,{href:`/advanced-exam-settings`,children:`Advanced Settings`}),` - Configure Login restrictions and other advanced options`]}),`\n`,_jsxs(_components.li,{children:[_jsx(_components.a,{href:`/best-practices-for-exam-creators`,children:`Best Practices for Test Creators`}),` - Tips for smooth test administration`]}),`\n`]})]})}function MDXContent(props={}){const{wrapper:MDXLayout}={..._provideComponents(),...props.components};return MDXLayout?_jsx(MDXLayout,{...props,children:_jsx(_createMdxContent,{...props})}):_createMdxContent(props)}return{default:MDXContent};function _missingMdxReference(id,component){throw new Error(`Expected `+(component?`component`:`object`)+\" `\"+id+\"` to be defined: you likely forgot to import, pass, or provide it.\")}","frontmatter":{},"scope":{"config":{},"pageMetadata":{"title":"Restrict Test Access to Specific Candidates","description":"Limit test participation to specific candidates on AutoProctor using link distribution, email restrictions, unique invitation links, or platform access controls.","href":"/restrict-access-to-candidates"}}},"mdxSourceWithNoJs":null},"mdxExtracts":{"tableOfContents":[{"title":"Method 1: Selective Link Distribution","slug":"method-1-selective-link-distribution","depth":2,"children":[]},{"title":"Method 2: Email-Based Restrictions","slug":"method-2-email-based-restrictions","depth":2,"children":[]},{"title":"Method 3: Unique Invitation Links","slug":"method-3-unique-invitation-links","depth":2,"children":[]},{"title":"Method 4: Google Forms Access Restrictions","slug":"method-4-google-forms-access-restrictions","depth":2,"children":[]},{"title":"Comparison of Access Control Methods","slug":"comparison-of-access-control-methods","depth":2,"children":[]},{"title":"Related Resources","slug":"related-resources","depth":2,"children":[]}],"codeExamples":{}},"jsLinks":["/_mintlify/custom/autoproctor/641fb79407bbe3eb/custom.js"],"subdomain":"autoproctor","siteName":"AutoProctor Help Center","title":"Restrict Test Access to Specific Candidates - AutoProctor Help Center","navMaps":{"firstHrefInVersion":{},"firstHrefInLanguage":{"en":{"href":"/restrict-access-to-candidates","matchLevel":0},"es":{"href":"/es/restrict-access-to-candidates","matchLevel":1},"pt":{"href":"/pt/restrict-access-to-candidates","matchLevel":1}}},"lastModified":"2026-10-01T14:31:25.967Z","originalFileLocation":"restrict-access-to-candidates.mdx","locale":"en"},"headHtml":"\u003cscript data-mint-head>(function(){var d=document.documentElement,p=\"light\";if(!p){try{p=localStorage.getItem(\"isDarkMode\")}catch(e){}if(p==='true')p='dark';else if(p==='false')p='light';if(p!=='light'\u0026\u0026p!=='dark'\u0026\u0026p!=='system')p=\"light\"}var r=p==='system'?(matchMedia(\"(prefers-color-scheme: dark)\").matches?'dark':'light'):p;d.classList.remove(r==='dark'?'light':'dark');d.classList.add(r);d.setAttribute(\"data-theme-preference\",p)})();\u003c/script>\u003cmeta data-mint-head name=\"description\" content=\"Limit test participation to specific candidates on AutoProctor using link distribution, email restrictions, unique invitation links, or platform access controls.\">\u003cmeta data-mint-head name=\"application-name\" content=\"AutoProctor Help Center\">\u003cmeta data-mint-head name=\"generator\" content=\"Mintlify\">\u003clink data-mint-head rel=\"icon\" type=\"image/png\" sizes=\"192x192\" href=\"/mintlify-assets/_mintlify/favicons/autoproctor/_5nbr_xRKUEKF7qX/_generated/favicon/android-chrome-192x192.png\" media=\"(prefers-color-scheme: light)\">\u003clink data-mint-head rel=\"apple-touch-icon\" type=\"image/png\" sizes=\"180x180\" href=\"/mintlify-assets/_mintlify/favicons/autoproctor/_5nbr_xRKUEKF7qX/_generated/favicon/apple-touch-icon.png\">\u003clink data-mint-head rel=\"icon\" type=\"image/png\" sizes=\"16x16\" href=\"/mintlify-assets/_mintlify/favicons/autoproctor/_5nbr_xRKUEKF7qX/_generated/favicon/favicon-16x16.png\" media=\"(prefers-color-scheme: light)\">\u003clink data-mint-head rel=\"icon\" type=\"image/png\" sizes=\"32x32\" href=\"/mintlify-assets/_mintlify/favicons/autoproctor/_5nbr_xRKUEKF7qX/_generated/favicon/favicon-32x32.png\" media=\"(prefers-color-scheme: light)\">\u003clink data-mint-head rel=\"shortcut icon\" type=\"image/x-icon\" href=\"/mintlify-assets/_mintlify/favicons/autoproctor/_5nbr_xRKUEKF7qX/_generated/favicon/favicon.ico\" media=\"(prefers-color-scheme: light)\">\u003clink data-mint-head rel=\"icon\" type=\"image/png\" sizes=\"192x192\" href=\"/mintlify-assets/_mintlify/favicons/autoproctor/_5nbr_xRKUEKF7qX/_generated/favicon-dark/android-chrome-192x192.png\" media=\"(prefers-color-scheme: dark)\">\u003clink data-mint-head rel=\"icon\" type=\"image/png\" sizes=\"16x16\" href=\"/mintlify-assets/_mintlify/favicons/autoproctor/_5nbr_xRKUEKF7qX/_generated/favicon-dark/favicon-16x16.png\" media=\"(prefers-color-scheme: dark)\">\u003clink data-mint-head rel=\"icon\" type=\"image/png\" sizes=\"32x32\" href=\"/mintlify-assets/_mintlify/favicons/autoproctor/_5nbr_xRKUEKF7qX/_generated/favicon-dark/favicon-32x32.png\" media=\"(prefers-color-scheme: dark)\">\u003clink data-mint-head rel=\"shortcut icon\" type=\"image/x-icon\" href=\"/mintlify-assets/_mintlify/favicons/autoproctor/_5nbr_xRKUEKF7qX/_generated/favicon-dark/favicon.ico\" media=\"(prefers-color-scheme: dark)\">\u003cmeta data-mint-head property=\"og:title\" content=\"Restrict Test Access to Specific Candidates - AutoProctor Help Center\">\u003cmeta data-mint-head property=\"og:description\" content=\"Limit test participation to specific candidates on AutoProctor using link distribution, email restrictions, unique invitation links, or platform access controls.\">\u003cmeta data-mint-head property=\"og:site_name\" content=\"AutoProctor Help Center\">\u003cmeta data-mint-head property=\"og:url\" content=\"https://help.autoproctor.co/restrict-access-to-candidates\">\u003cmeta data-mint-head property=\"og:type\" content=\"website\">\u003cmeta data-mint-head property=\"og:image\" content=\"https://autoproctor.mintlify.app/_mintlify/api/og/v2?division=Access+%26+Limits\u0026amp;title=Restrict+Test+Access+to+Specific+Candidates\u0026amp;description=Limit+test+participation+to+specific+candidates+on+AutoProctor+using+link+distribution%2C+email+restrictions%2C+unique+invitation+links%2C+or+platform+access+controls\u0026amp;theme=efa61d250935c79f58489680\u0026amp;signature=18f132d4bb69358af64242decc13d177c85baf5dda73952548f2da4523021886\">\u003cmeta data-mint-head property=\"og:image:width\" content=\"1200\">\u003cmeta data-mint-head property=\"og:image:height\" content=\"630\">\u003cmeta data-mint-head name=\"twitter:card\" content=\"summary_large_image\">\u003cmeta data-mint-head name=\"twitter:title\" content=\"Restrict Test Access to Specific Candidates - AutoProctor Help Center\">\u003cmeta data-mint-head name=\"twitter:description\" content=\"Limit test participation to specific candidates on AutoProctor using link distribution, email restrictions, unique invitation links, or platform access controls.\">\u003cmeta data-mint-head name=\"twitter:image\" content=\"https://autoproctor.mintlify.app/_mintlify/api/og/v2?division=Access+%26+Limits\u0026amp;title=Restrict+Test+Access+to+Specific+Candidates\u0026amp;description=Limit+test+participation+to+specific+candidates+on+AutoProctor+using+link+distribution%2C+email+restrictions%2C+unique+invitation+links%2C+or+platform+access+controls\u0026amp;theme=efa61d250935c79f58489680\u0026amp;signature=18f132d4bb69358af64242decc13d177c85baf5dda73952548f2da4523021886\">\u003cmeta data-mint-head name=\"twitter:image:width\" content=\"1200\">\u003cmeta data-mint-head name=\"twitter:image:height\" content=\"630\">\u003cmeta data-mint-head name=\"msapplication-config\" content=\"/mintlify-assets/_mintlify/favicons/autoproctor/_5nbr_xRKUEKF7qX/_generated/favicon/browserconfig.xml\">\u003cmeta data-mint-head name=\"apple-mobile-web-app-title\" content=\"AutoProctor Help Center\">\u003cmeta data-mint-head name=\"msapplication-TileColor\" content=\"#1f398a\">\u003clink data-mint-head rel=\"canonical\" href=\"https://help.autoproctor.co/restrict-access-to-candidates\">\u003clink data-mint-head rel=\"alternate\" type=\"application/xml\" href=\"/sitemap.xml\">\u003clink data-mint-head rel=\"alternate\" type=\"text/markdown\" href=\"/restrict-access-to-candidates.md\">\u003clink data-mint-head rel=\"alternate\" hreflang=\"en\" href=\"https://help.autoproctor.co/restrict-access-to-candidates\">\u003clink data-mint-head rel=\"alternate\" hreflang=\"es\" href=\"https://help.autoproctor.co/es/restrict-access-to-candidates\">\u003clink data-mint-head rel=\"alternate\" hreflang=\"pt\" href=\"https://help.autoproctor.co/pt/restrict-access-to-candidates\">\u003clink data-mint-head rel=\"alternate\" hreflang=\"x-default\" href=\"https://help.autoproctor.co/restrict-access-to-candidates\">\u003cscript data-mint-head type=\"application/ld+json\">{\"@context\":\"https://schema.org\",\"@graph\":[{\"@type\":\"Organization\",\"@id\":\"https://help.autoproctor.co/#organization\",\"name\":\"AutoProctor Help Center\",\"url\":\"https://help.autoproctor.co\",\"logo\":{\"@type\":\"ImageObject\",\"url\":\"https://mintcdn.com/autoproctor/W-xf3W76sMq0h8jF/logo/light.svg?fit=max\u0026auto=format\u0026n=W-xf3W76sMq0h8jF\u0026q=85\u0026s=3e6e1b165ff9dcf79c4a97b161c4a116\"}},{\"@type\":\"WebSite\",\"@id\":\"https://help.autoproctor.co#website\",\"name\":\"AutoProctor Help Center\",\"url\":\"https://help.autoproctor.co\",\"publisher\":{\"@id\":\"https://help.autoproctor.co/#organization\"}},{\"@type\":\"WebPage\",\"@id\":\"https://help.autoproctor.co/restrict-access-to-candidates#webpage\",\"url\":\"https://help.autoproctor.co/restrict-access-to-candidates\",\"name\":\"Restrict Test Access to Specific Candidates\",\"description\":\"Limit test participation to specific candidates on AutoProctor using link distribution, email restrictions, unique invitation links, or platform access controls.\",\"dateModified\":\"2026-10-01T14:31:25.967Z\",\"isPartOf\":{\"@id\":\"https://help.autoproctor.co#website\"},\"breadcrumb\":{\"@id\":\"https://help.autoproctor.co/restrict-access-to-candidates#breadcrumb\"}},{\"@type\":\"BreadcrumbList\",\"@id\":\"https://help.autoproctor.co/restrict-access-to-candidates#breadcrumb\",\"itemListElement\":[{\"@type\":\"ListItem\",\"position\":1,\"name\":\"Tests \u0026 Results\",\"item\":\"https://help.autoproctor.co/create-proctored-exam\"},{\"@type\":\"ListItem\",\"position\":2,\"name\":\"Access \u0026 Limits\",\"item\":\"https://help.autoproctor.co/restrict-access-by-email\"},{\"@type\":\"ListItem\",\"position\":3,\"name\":\"Restrict Test Access to Specific Candidates\",\"item\":\"https://help.autoproctor.co/restrict-access-to-candidates\"}]},{\"@type\":[\"Article\",\"TechArticle\"],\"@id\":\"https://help.autoproctor.co/restrict-access-to-candidates#article\",\"headline\":\"Restrict Test Access to Specific Candidates\",\"name\":\"Restrict Test Access to Specific Candidates\",\"description\":\"Limit test participation to specific candidates on AutoProctor using link distribution, email restrictions, unique invitation links, or platform access controls.\",\"url\":\"https://help.autoproctor.co/restrict-access-to-candidates\",\"mainEntityOfPage\":{\"@id\":\"https://help.autoproctor.co/restrict-access-to-candidates#webpage\"},\"dateModified\":\"2026-10-01T14:31:25.967Z\",\"publisher\":{\"@id\":\"https://help.autoproctor.co/#organization\"},\"isPartOf\":{\"@id\":\"https://help.autoproctor.co#website\"}}]}\u003c/script>\u003cscript data-mint-head type=\"application/ld+json\">{\"@context\":\"https://schema.org\",\"@type\":\"WebSite\",\"name\":\"AutoProctor Help Center\",\"creator\":{\"@type\":\"Organization\",\"name\":\"Mintlify\",\"url\":\"https://mintlify.com\"}}\u003c/script>","siteName":"AutoProctor Help Center","nav":{"global":{},"languages":[{"language":"en","default":true,"groups":[{"group":"Tests \u0026 Results","icon":"clipboard-list","expanded":true,"pages":[{"group":"Create","pages":[{"title":"Your First Proctored Test","href":"/create-proctored-exam"},{"title":"Quiz Providers","href":"/supported-quiz-providers"},{"title":"Proctoring Settings","href":"/proctoring-settings"},{"title":"Enhanced Proctoring","href":"/enhanced-proctoring"},{"title":"Timer Settings","href":"/timer-settings"},{"title":"Advanced Settings","href":"/advanced-exam-settings"},{"title":"Resuming Test Attempts","href":"/resume-exam-attempts"},{"title":"Resuming Google Forms Tests","href":"/resume-google-forms-exam"},{"title":"Instructions Page for Candidates","href":"/candidate-instructions-page"},{"title":"Closing, Hiding and Deleting Tests","href":"/archive-and-delete-exams"},{"title":"IFrame Query Arguments","href":"/iframe-query-arguments"},{"title":"AutoProctor Add-On Error","href":"/google-forms-addon-error"}]},{"group":"Results","pages":[{"title":"Where Can I See My Quiz Results?","href":"/where-to-find-quiz-results"},{"title":"Where Can I See Proctoring Results?","href":"/where-to-find-proctoring-results"},{"title":"Access Answers and Candidate Responses","href":"/access-candidate-responses"},{"title":"View Unsubmitted Tests","href":"/view-unsubmitted-exams"},{"title":"Export Results to Excel","href":"/export-results-to-excel"},{"title":"Write Results to Google Sheets","href":"/write-results-to-google-sheets"},{"title":"Share Test Results","href":"/share-exam-results"}]},{"group":"Access \u0026 Limits","pages":[{"title":"Restrict Test Access by Email Address","description":"Limit who can take your test by restricting access to specific email domains or individual email addresses using Login restrictions.","href":"/restrict-access-by-email"},{"title":"Restrict Test Access to Specific Candidates","href":"/restrict-access-to-candidates"},{"title":"Inviting Candidates via Email","description":"Generate a unique test link for each candidate's email address on the Unique test URLs page, with email verification, on AutoProctor.","href":"/invite-candidates-via-email"},{"title":"Maximum Attempts for a Test","href":"/maximum-exam-attempts"},{"title":"Concurrency - Max Simultaneous Candidates","href":"/max-simultaneous-candidates"},{"title":"Adding Collaborators to Your Tests","href":"/add-collaborators"}]},{"group":"Issues","pages":[{"title":"False 'Switched to Different Application'","href":"/false-app-switch-alert"},{"title":"No Face or Multiple Faces Detected Incorrectly","href":"/no-face-or-multiple-faces-detected"},{"title":"Missing Violation Evidence in Report","href":"/missing-violation-evidence"},{"title":"Missing Random Photos in Report","href":"/missing-random-photos"},{"title":"Missing Images and Recordings in Report","href":"/missing-images-and-recordings"},{"title":"What Does 'Went Offline' Mean?","href":"/what-does-went-offline-mean"},{"title":"Incorrect Candidate Name in Results","href":"/incorrect-candidate-name-in-results"},{"title":"Cannot See Response in Google Form","href":"/google-forms-response-not-visible"},{"title":"Quiz Issues on IFrame Tests","href":"/quiz-issues-on-iframe-tests"}]}]},{"group":"Candidate Guide","icon":"life-ring","expanded":true,"pages":[{"group":"Attempting Tests","pages":[{"title":"Instructions for Taking a Proctored Test","href":"/take-proctored-exam"},{"title":"Instructions for Taking a Timed Test","href":"/take-timed-exam"},{"title":"Instructions for Taking a Proctored Socratease Quiz","href":"/take-proctored-socratease-quiz"},{"title":"Instructions for Taking a Timed Socratease Quiz","href":"/take-timed-socratease-quiz"},{"title":"Submit Button: Socratease vs Other Quizzes","href":"/how-to-submit-quiz"},{"title":"Candidate Login Methods","href":"/candidate-login-methods"},{"title":"How to Logout of AutoProctor","href":"/how-to-logout"}]},{"group":"Issues","pages":[{"title":"Test Stuck at Loading Screen","href":"/test-stuck-at-loading-screen"},{"title":"Blank Page or Grey Screen During Test","href":"/blank-screen-during-test"},{"title":"Test is Slow and Laggy","href":"/test-slow-and-laggy"},{"title":"Cannot Click on Answers in Test Form","href":"/cannot-click-answers-during-test"},{"title":"Cannot See Questions on Google Forms","href":"/google-forms-questions-not-visible"}]}]},{"group":"Understanding AutoProctor","icon":"book-open","expanded":true,"pages":[{"group":"Getting Started","pages":[{"title":"Before You Get Started","href":"/before-you-get-started"},{"title":"Device Compatibility","href":"/device-compatibility"},{"title":"Best Practices for Test Creators","href":"/best-practices-for-exam-creators"},{"title":"Frequently Asked Questions","href":"/faqs"}]},{"group":"How Proctoring Works","pages":[{"title":"What Gets Tracked During Proctoring","href":"/what-gets-tracked-during-proctoring"},{"title":"Trust Score","href":"/what-is-trust-score"},{"title":"Does AutoProctor Record Video?","href":"/does-autoproctor-record-video"}]}]},{"group":"Socratease Quizzes","icon":"graduation-cap","expanded":true,"pages":[{"group":"Create \u0026 Questions","pages":[{"title":"Why Socratease Quiz?","href":"/why-socratease"},{"title":"How to Create a Socratease Quiz","href":"/create-socratease-quiz"},{"title":"Socratease Question Types","href":"/socratease-question-types"},{"title":"Question Settings","href":"/socratease-question-settings"},{"title":"Question Type Availability by Plan","href":"/question-type-availability"},{"title":"Bulk Import Questions from Excel","href":"/import-questions-from-excel"},{"title":"Question Banks","href":"/question-banks"}]},{"group":"Settings","pages":[{"title":"Socratease Quiz Settings","href":"/socratease-quiz-settings"},{"title":"Question Display Mode","href":"/question-display-mode"},{"title":"Showing Results to Candidates","href":"/show-results-to-candidates"},{"title":"Using Tags","href":"/using-tags"},{"title":"Using LaTeX for Math Equations","href":"/latex-math-equations"}]}]},{"group":"Pricing \u0026 Account","icon":"credit-card","expanded":true,"pages":[{"group":"Plans \u0026 Credits","pages":[{"title":"Payments and Credits Explained","href":"/payments-and-credits"},{"title":"Feature Comparison by Plan","mode":"wide","href":"/feature-comparison"},{"title":"Elite Plan Features","href":"/elite-plan-features"},{"title":"One-Time Subscription for Infrequent Use","href":"/one-time-subscription"},{"title":"How to Cancel Your Subscription","href":"/cancel-subscription"}]},{"group":"Billing \u0026 Teams","pages":[{"title":"What is a Team on AutoProctor?","href":"/what-is-a-team"},{"title":"Purchased Packs Not Showing Up","href":"/purchased-packs-not-showing"},{"title":"Track Your Test Pack Credit Usage","href":"/track-credit-usage"},{"title":"Invoices and Receipts for Payments","href":"/invoices-and-receipts"},{"title":"Editing Your Billing Information","href":"/edit-billing-information"}]},{"group":"Support","pages":[{"title":"Contact Us","href":"/contact-us"},{"title":"Booking a Demo","href":"/book-a-demo"}]}]}]},{"language":"es","pages":[{"title":"es","href":"/es/restrict-access-to-candidates"}]},{"language":"pt","pages":[{"title":"pt","href":"/pt/restrict-access-to-candidates"}]}]},"title":"Restrict Test Access to Specific Candidates - AutoProctor Help Center","buildId":"dpl_5UDDZ9hnigTkoV7QtvQ39eUp84nu","deploymentId":"dpl_5UDDZ9hnigTkoV7QtvQ39eUp84nu","dynamics":["07c022d89b","a74be98ba7"],"chunks":["Frame-CUTvSGqu.js","DynamicMarkdown-BGu84FgU.js","zoom-image-lightbox-ChyC7Hte.js","PlusIcon-DXkY3IBj.js","lightbox-handle-r17bVUz3.js"]}