Learn about the data feeds, detection capabilities, and evidence recording available in AutoProctor’s proctoring system.
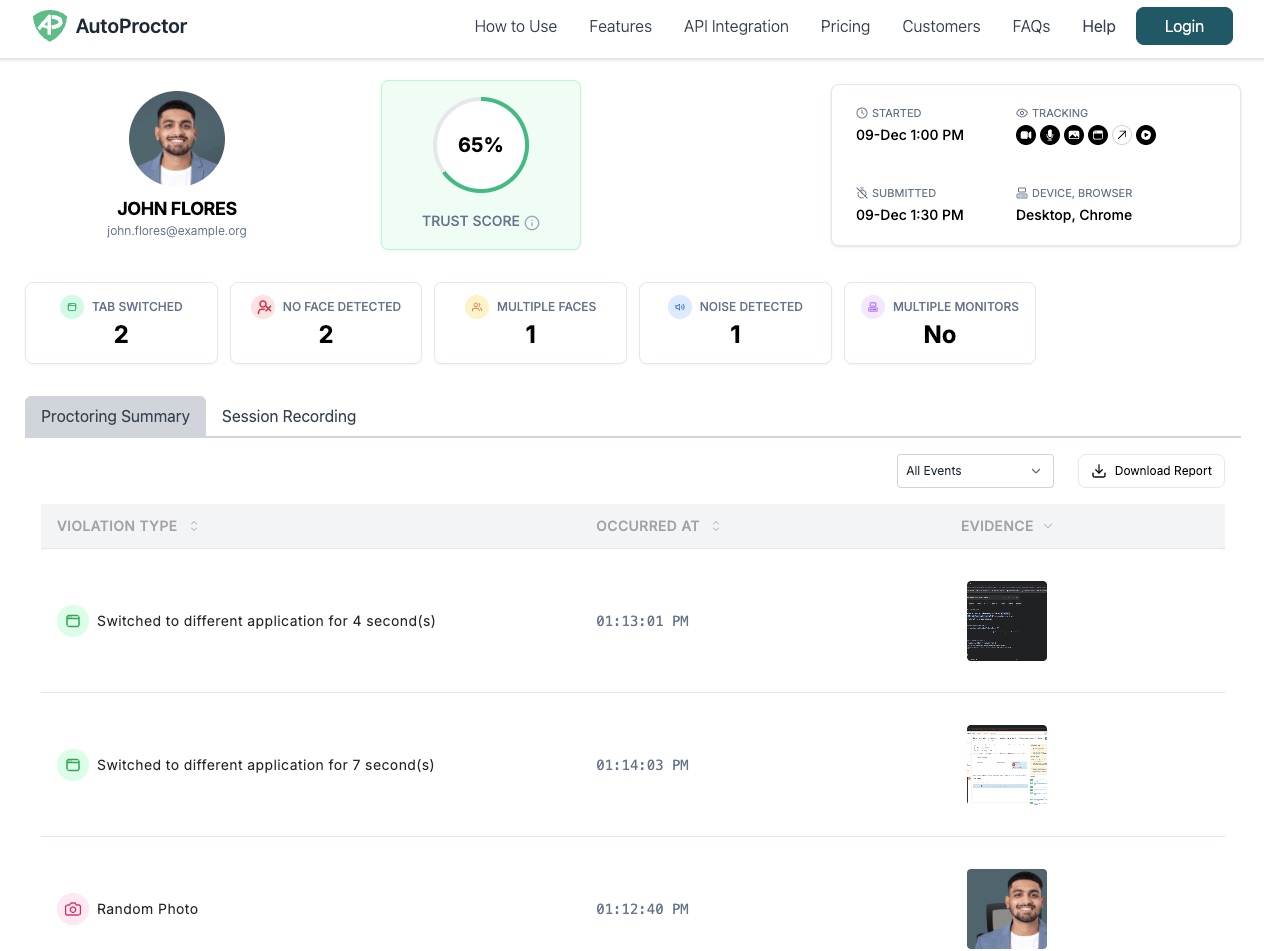
AutoProctor monitors candidates in real time using on-device AI and captures evidence only when it detects a violation. This means you review flagged incidents rather than hours of footage.
A sample proctoring report showing the Trust Score, violation counts, and flagged events with evidence
Unlike traditional proctoring platforms that record full video and audio sessions, AutoProctor detects violations and shows you evidence of only those violations, so you do not spend hours reviewing each candidate’s attempt.The last column is the switch that turns each feature on, in the Proctoring section of a test’s Settings.
Detection Feature
What It Does
Setting
Background audio detection
Records noise and audio cues from the microphone feed
Microphone
Face detection
Captures photos when no face or multiple faces appear on camera
Camera
Tab/app switching
Captures screenshots when candidates switch tabs or applications
Tab switching
Random photos
Takes photos at random intervals throughout the exam
Photos at random
Multiple monitor check
Blocks the test while an extra monitor is connected to the device
Prevent multiple monitors
Multi-session detection
Detects attempts made from multiple devices or sessions at the same time
Multi-session detection
Pre-test face capture
Takes a photo of the candidate’s face before the test starts
Photo before test start
Full-screen enforcement
Ensures the test runs in full-screen mode and flags exits
Enforce full screen
Session action recording
Logs mouse clicks and keyboard activity throughout the test
Session recording
Auxiliary device pairing
Monitors via a paired phone to detect keyboard usage, ensuring candidates are not using ChatGPT or other tools to cheat
Auxiliary device
All tracking features are configurable per test. Turn on only what you need in your proctoring settings.
Go to your Tests page and click Settings next to the test.
A test on the Tests page, with its Settings button on the right
2
Open the Proctoring section
Choose Proctoring from the list of sections, and turn on the switch at the top right of the section. While the switch is Off, nothing is monitored.
3
Turn on the features you need
Under What gets tracked and Enhanced proctoring, turn each tracking feature on or off depending on your requirements. For example, you might turn on Camera and Tab switching but leave Microphone off.
Tab switching and Camera on, Microphone off
4
Save your settings
Click Save settings to apply your changes. These settings take effect immediately for all future test attempts.
Enabling more tracking features increases the processing load on the candidate’s device. If your candidates use older hardware, consider enabling only the features you need most. See Device Compatibility for minimum requirements.
{"docsConfig":{"theme":"maple","$schema":"https://mintlify.com/docs.json","name":"AutoProctor Help Center","colors":{"primary":"#1f398a","light":"#5dbd84","dark":"#1f398a"},"logo":{"light":"https://mintcdn.com/autoproctor/W-xf3W76sMq0h8jF/logo/light.svg?fit=max\u0026auto=format\u0026n=W-xf3W76sMq0h8jF\u0026q=85\u0026s=3e6e1b165ff9dcf79c4a97b161c4a116","dark":"https://mintcdn.com/autoproctor/W-xf3W76sMq0h8jF/logo/dark.svg?fit=max\u0026auto=format\u0026n=W-xf3W76sMq0h8jF\u0026q=85\u0026s=4998e30d272cd83fe55c7780bd016cd5","href":"/"},"favicon":"https://mintcdn.com/autoproctor/ppA8ifNdbhTkKwqD/favicon.svg?fit=max\u0026auto=format\u0026n=ppA8ifNdbhTkKwqD\u0026q=85\u0026s=c12901c16b16ea6e6467434d2e38e71f","appearance":{"default":"light","strict":true},"background":{"decoration":"grid"},"navbar":{},"footer":{"socials":{"website":"https://www.autoproctor.co/","linkedin":"https://www.linkedin.com/company/autoproctorhq","youtube":"https://www.youtube.com/@autoproctor1043"}},"seo":{"metatags":{"og:site_name":"AutoProctor Help Center"}},"integrations":{"telemetry":{"enabled":true}},"styling":{"latex":false},"navigation":{"global":{},"languages":[{"language":"en","default":true,"href":"create-proctored-exam"},{"language":"es","href":"es/create-proctored-exam"},{"language":"pt","href":"pt/create-proctored-exam"}]}},"deployment":{"deploymentMetadataValue":{"subdomain":"autoproctor","hasAudioNarration":false,"actualSubdomain":"autoproctor","customDomains":["help.autoproctor.co"],"gitSource":{"type":"github","owner":"socrateasehq","repo":"autoproctor-mintlify-docs","deployBranch":"main","contentDirectory":"","isPrivate":true,"mountPath":"","label":""},"chroma":{"liveDeploymentHistoryId":"6ace3fe0d480d6cbf574dab2","collectionId":"b60ac5bf-03c9-4ba4-963c-777a76776736","schemaVersion":"v3","latestBuiltDeploymentHistoryId":"6ace3fe0d480d6cbf574dab2"},"feedback":{"thumbs":true},"entitlements":{},"buildId":"6ace3fe0d480d6cbf574dab2","clientVersion":"0.0.3939","searchFilterCounts":[{"language":"en","tag":"Tests \u0026 Results","count":34},{"language":"es","tag":"Exámenes y Resultados","count":34},{"language":"pt","tag":"Testes e Resultados","count":34},{"language":"en","tag":"Issues","count":14},{"language":"es","tag":"Problemas","count":14},{"language":"pt","tag":"Problemas","count":14},{"language":"en","tag":"Create","count":12},{"language":"en","tag":"Candidate Guide","count":12},{"language":"en","tag":"Pricing \u0026 Account","count":12},{"language":"en","tag":"Socratease Quizzes","count":12},{"language":"es","tag":"Crear","count":12},{"language":"es","tag":"Guía del Candidato","count":12},{"language":"es","tag":"Precios y Cuenta","count":12},{"language":"es","tag":"Cuestionarios Socratease","count":12},{"language":"pt","tag":"Criar","count":12},{"language":"pt","tag":"Guia do Candidato","count":12},{"language":"pt","tag":"Preços e Conta","count":12},{"language":"pt","tag":"Questionários Socratease","count":12},{"language":"en","tag":"Results","count":7},{"language":"en","tag":"Understanding AutoProctor","count":7},{"language":"en","tag":"Attempting Tests","count":7},{"language":"en","tag":"Create \u0026 Questions","count":7},{"language":"es","tag":"Resultados","count":7},{"language":"es","tag":"Conociendo AutoProctor","count":7},{"language":"es","tag":"Intentar Exámenes","count":7},{"language":"es","tag":"Crear y Preguntas","count":7},{"language":"pt","tag":"Resultados","count":7},{"language":"pt","tag":"Conhecendo o AutoProctor","count":7},{"language":"pt","tag":"Realizando Testes","count":7},{"language":"pt","tag":"Criar e Perguntas","count":7}]},"assistantConfig":{"enableAskAiButton":false,"enableStarterQuestions":false,"enableContextualStarterQuestions":false,"enableAskAiSearchBar":true},"hasChatPermissions":false,"hasWebMcpPermissions":false,"toggles":[{"name":"kill-isr","enabled":true,"variant":{"name":"disabled","enabled":false,"feature_enabled":true},"impressionData":false},{"name":"agent-mintlify-slack","enabled":true,"variant":{"name":"disabled","enabled":false,"feature_enabled":true},"impressionData":false},{"name":"editor-v7-file-tree","enabled":true,"variant":{"name":"disabled","enabled":false,"feature_enabled":true},"impressionData":false},{"name":"agent-integrations-settings","enabled":true,"variant":{"name":"disabled","enabled":false,"feature_enabled":true},"impressionData":false},{"name":"automations-pr-grouping","enabled":true,"variant":{"name":"disabled","enabled":false,"feature_enabled":true},"impressionData":false},{"name":"custom-prefix","enabled":true,"variant":{"name":"disabled","enabled":false,"feature_enabled":true},"impressionData":false},{"name":"analytics-v7","enabled":true,"variant":{"name":"disabled","enabled":false,"feature_enabled":true},"impressionData":false},{"name":"user-flows-analytics","enabled":true,"variant":{"name":"disabled","enabled":false,"feature_enabled":true},"impressionData":false},{"name":"no-publish-flow","enabled":true,"variant":{"name":"disabled","enabled":false,"feature_enabled":true},"impressionData":false},{"name":"workos-onboarding","enabled":true,"variant":{"name":"disabled","enabled":false,"feature_enabled":true},"impressionData":false},{"name":"llms-txt-v2","enabled":true,"variant":{"name":"disabled","enabled":false,"feature_enabled":true},"impressionData":false},{"name":"pause-universal-search-reconcile","enabled":true,"variant":{"name":"disabled","enabled":false,"feature_enabled":true},"impressionData":false},{"name":"snapshot-serving-live","enabled":true,"variant":{"name":"disabled","enabled":false,"feature_enabled":true},"impressionData":false},{"name":"stripTemperatureMiddleware","enabled":true,"variant":{"name":"disabled","enabled":false,"feature_enabled":true},"impressionData":false},{"name":"per-site-search-delta","enabled":true,"variant":{"name":"disabled","enabled":false,"feature_enabled":true},"impressionData":false},{"name":"support-platform-pylon-zendesk","enabled":true,"variant":{"name":"disabled","enabled":false,"feature_enabled":true},"impressionData":false},{"name":"snapshot-serving","enabled":true,"variant":{"name":"disabled","enabled":false,"feature_enabled":true},"impressionData":false},{"name":"instant-rollback","enabled":true,"variant":{"name":"disabled","enabled":false,"feature_enabled":true},"impressionData":false},{"name":"granular-notifications-server","enabled":true,"variant":{"name":"disabled","enabled":false,"feature_enabled":true},"impressionData":false},{"name":"granular-notifications","enabled":true,"variant":{"name":"disabled","enabled":false,"feature_enabled":true},"impressionData":false},{"name":"editor-private-page-search","enabled":true,"variant":{"name":"disabled","enabled":false,"feature_enabled":true},"impressionData":false},{"name":"automations-fable","enabled":true,"variant":{"name":"disabled","enabled":false,"feature_enabled":true},"impressionData":false},{"name":"fixed-ai-action-pricing","enabled":true,"variant":{"name":"disabled","enabled":false,"feature_enabled":true},"impressionData":false},{"name":"automation-resolve-merge-conflict","enabled":true,"variant":{"name":"disabled","enabled":false,"feature_enabled":true},"impressionData":false},{"name":"scoped-publishing","enabled":true,"variant":{"name":"disabled","enabled":false,"feature_enabled":true},"impressionData":false},{"name":"mintql","enabled":true,"variant":{"name":"disabled","enabled":false,"feature_enabled":true},"impressionData":false},{"name":"page-level-analytics","enabled":true,"variant":{"name":"disabled","enabled":false,"feature_enabled":true},"impressionData":false},{"name":"editor-version-history-v2","enabled":true,"variant":{"name":"disabled","enabled":false,"feature_enabled":true},"impressionData":false},{"name":"editor-nav-generations","enabled":true,"variant":{"name":"disabled","enabled":false,"feature_enabled":true},"impressionData":false},{"name":"billing-page-v2","enabled":true,"variant":{"name":"disabled","enabled":false,"feature_enabled":true},"impressionData":false},{"name":"workspace-projects","enabled":true,"variant":{"name":"disabled","enabled":false,"feature_enabled":true},"impressionData":false},{"name":"assistant-v5","enabled":true,"variant":{"name":"disabled","enabled":false,"feature_enabled":true},"impressionData":false},{"name":"byok-sep-25","enabled":true,"variant":{"name":"disabled","enabled":false,"feature_enabled":true},"impressionData":false},{"name":"fork-pr-previews","enabled":true,"variant":{"name":"disabled","enabled":false,"feature_enabled":true},"impressionData":false},{"name":"revalidation-jwt","enabled":true,"variant":{"name":"disabled","enabled":false,"feature_enabled":true},"impressionData":false},{"name":"vite-origin","enabled":true,"variant":{"name":"disabled","enabled":false,"feature_enabled":true},"impressionData":false},{"name":"editor-agent-model-picker","enabled":true,"variant":{"name":"disabled","enabled":false,"feature_enabled":true},"impressionData":false},{"name":"billing-updated-9-15","enabled":true,"variant":{"name":"disabled","enabled":false,"feature_enabled":true},"impressionData":false},{"name":"hobby-abuse-scan","enabled":true,"variant":{"name":"disabled","enabled":false,"feature_enabled":true},"impressionData":false},{"name":"dashboard-inbox","enabled":true,"variant":{"name":"disabled","enabled":false,"feature_enabled":true},"impressionData":false}],"isAtlas":false,"googleFontsInlined":false},"customCss":[{"filePath":"custom.css","content":".eyebrow,footer a[href*=\"mintlify.com\"],nav[aria-label=Pages]>ul{display:none!important}#content-area{max-width:64rem;container-type:inline-size}@media (min-width:1024px){.lg\\:ml-\\[19rem\\]{padding-left:3rem!important;padding-right:2rem!important}}#content-area h2{margin-top:1.5rem}#content-area h3{padding-left:.75rem;border-left:2px solid #d1d5db}#content.mdx-content{margin-top:1rem}main .mt-2.text-lg.prose,main [role=banner]>div.prose,main header>div.prose{color:#9ca3af!important;font-weight:400;font-size:1.125rem;line-height:1.6;margin-bottom:.5rem}img.nav-logo{height:2rem!important}.custom-sidebar-icons{flex-shrink:0}#content-area a.link{color:#2563eb;text-decoration-color:#2563eb;border-bottom-color:#2563eb}#content-area a.link:hover{color:#1d4ed8}#related-resources{margin-top:3.5rem;padding-top:1.5rem;border-top:1px solid #e5e7eb;font-size:.95rem;color:#6b7280}#related-resources+ul{color:#6b7280;font-size:.9rem}#content-area .frame{width:fit-content;max-width:100%;min-width:200px;margin-left:auto;margin-right:auto}#content-area .frame img,#content-area .frame video{max-width:70cqi;height:auto;display:block}#content-area .frame iframe{width:70cqi;display:block}#sidebar-content>div.mt-6{margin-top:1rem;display:flex;justify-content:center}"}],"page":{"pagePath":"what-gets-tracked-during-proctoring","slug":"/what-gets-tracked-during-proctoring","pageMetadata":{"title":"What Gets Tracked During Proctoring","description":"Learn about the data feeds, detection capabilities, and evidence recording available in AutoProctor's proctoring system.","href":"/what-gets-tracked-during-proctoring"},"description":{"compiledSource":"\"use strict\";\nconst {jsx: _jsx} = arguments[0];\nconst {useMDXComponents: _provideComponents} = arguments[0];\nfunction _createMdxContent(props) {\n const _components = {\n p: \"p\",\n ..._provideComponents(),\n ...props.components\n };\n return _jsx(_components.p, {\n children: \"Learn about the data feeds, detection capabilities, and evidence recording available in AutoProctor’s proctoring system.\"\n });\n}\nfunction MDXContent(props = {}) {\n const {wrapper: MDXLayout} = {\n ..._provideComponents(),\n ...props.components\n };\n return MDXLayout ? _jsx(MDXLayout, {\n ...props,\n children: _jsx(_createMdxContent, {\n ...props\n })\n }) : _createMdxContent(props);\n}\nreturn {\n default: MDXContent\n};\n","frontmatter":{},"scope":{}},"pageType":"default","mdx":{"mdxSource":{"compiledSource":"\"use strict\";const{Fragment:_Fragment,jsx:_jsx,jsxs:_jsxs}=arguments[0];const{useMDXComponents:_provideComponents}=arguments[0];function _createMdxContent(props){const _components={a:`a`,li:`li`,p:`p`,strong:`strong`,tbody:`tbody`,td:`td`,th:`th`,thead:`thead`,tr:`tr`,ul:`ul`,..._provideComponents(),...props.components},{Frame,Heading,Note,OptimizedImage,Step,Steps,Table,Warning}=_components;if(!Frame)_missingMdxReference(`Frame`,true);if(!Heading)_missingMdxReference(`Heading`,true);if(!Note)_missingMdxReference(`Note`,true);if(!OptimizedImage)_missingMdxReference(`OptimizedImage`,true);if(!Step)_missingMdxReference(`Step`,true);if(!Steps)_missingMdxReference(`Steps`,true);if(!Table)_missingMdxReference(`Table`,true);if(!Warning)_missingMdxReference(`Warning`,true);return _jsxs(_Fragment,{children:[_jsx(_components.p,{children:`AutoProctor monitors candidates in real time using on-device AI and captures evidence only when it detects a violation. This means you review flagged incidents rather than hours of footage.`}),`\n`,_jsx(Frame,{caption:`A sample proctoring report showing the Trust Score, violation counts, and flagged events with evidence`,children:_jsx(OptimizedImage,{src:`https://mintcdn.com/autoproctor/kkutndNW2DNn8qV8/images/getting-started/sample-proctoring-report.png?fit=max\u0026auto=format\u0026n=kkutndNW2DNn8qV8\u0026q=85\u0026s=2be6c1fa9b19b23d9f4fe65d6f87db07`,alt:`Sample proctoring report`,\"data-og-width\":`1264`,width:`1264`,\"data-og-height\":`951`,height:`951`,\"data-path\":`images/getting-started/sample-proctoring-report.png`,\"data-optimize\":`true`,\"data-opv\":`3`,srcset:`https://mintcdn.com/autoproctor/kkutndNW2DNn8qV8/images/getting-started/sample-proctoring-report.png?w=280\u0026fit=max\u0026auto=format\u0026n=kkutndNW2DNn8qV8\u0026q=85\u0026s=75e060dc9d92ed90ca126c849aab8d00 280w, https://mintcdn.com/autoproctor/kkutndNW2DNn8qV8/images/getting-started/sample-proctoring-report.png?w=560\u0026fit=max\u0026auto=format\u0026n=kkutndNW2DNn8qV8\u0026q=85\u0026s=89ecf1a796b538281f17fd2dc8116556 560w, https://mintcdn.com/autoproctor/kkutndNW2DNn8qV8/images/getting-started/sample-proctoring-report.png?w=840\u0026fit=max\u0026auto=format\u0026n=kkutndNW2DNn8qV8\u0026q=85\u0026s=0fd4b22b78750eaf355942c55603f581 840w, https://mintcdn.com/autoproctor/kkutndNW2DNn8qV8/images/getting-started/sample-proctoring-report.png?w=1100\u0026fit=max\u0026auto=format\u0026n=kkutndNW2DNn8qV8\u0026q=85\u0026s=0d239ba5906e0465313e1fb398c3b3ea 1100w, https://mintcdn.com/autoproctor/kkutndNW2DNn8qV8/images/getting-started/sample-proctoring-report.png?w=1650\u0026fit=max\u0026auto=format\u0026n=kkutndNW2DNn8qV8\u0026q=85\u0026s=f4ca49bb0f695805c51a27301a6f686f 1650w, https://mintcdn.com/autoproctor/kkutndNW2DNn8qV8/images/getting-started/sample-proctoring-report.png?w=2500\u0026fit=max\u0026auto=format\u0026n=kkutndNW2DNn8qV8\u0026q=85\u0026s=3e8480fa24f23e76ddbef571e62e206f 2500w`})}),`\n`,_jsxs(_components.p,{children:[_jsx(_components.a,{href:`https://www.autoproctor.co/sample-dashboard/`,children:`View sample proctoring results`}),` to explore a live report.`]}),`\n`,_jsx(Heading,{level:`2`,id:`data-feeds`,children:`Data Feeds`}),`\n`,_jsx(_components.p,{children:`AutoProctor can access the following feeds on the candidate’s device:`}),`\n`,_jsxs(Table,{children:[_jsx(_components.thead,{children:_jsxs(_components.tr,{children:[_jsx(_components.th,{children:`Feed`}),_jsx(_components.th,{children:`What It Does`})]})}),_jsxs(_components.tbody,{children:[_jsxs(_components.tr,{children:[_jsx(_components.td,{children:_jsx(_components.strong,{children:`Camera feed`})}),_jsx(_components.td,{children:`Monitors the candidate’s face and surroundings`})]}),_jsxs(_components.tr,{children:[_jsx(_components.td,{children:_jsx(_components.strong,{children:`Microphone feed`})}),_jsx(_components.td,{children:`Detects background noise and audio cues`})]}),_jsxs(_components.tr,{children:[_jsx(_components.td,{children:_jsx(_components.strong,{children:`Screen share feed`})}),_jsx(_components.td,{children:`Captures screen activity during the test`})]}),_jsxs(_components.tr,{children:[_jsx(_components.td,{children:_jsx(_components.strong,{children:`Auxiliary device camera feed`})}),_jsx(_components.td,{children:`Monitors via a paired secondary device (e.g., phone)`})]})]})]}),`\n`,_jsx(Note,{children:_jsxs(_components.p,{children:[`Which feeds AutoProctor accesses depends entirely on how you configure each test. You turn each feed on or off in your `,_jsx(_components.a,{href:`/proctoring-settings`,children:`proctoring settings`}),`.`]})}),`\n`,_jsx(Heading,{level:`2`,id:`what-autoproctor-detects-and-records`,children:`What AutoProctor Detects and Records`}),`\n`,_jsx(_components.p,{children:`Unlike traditional proctoring platforms that record full video and audio sessions, AutoProctor detects violations and shows you evidence of only those violations, so you do not spend hours reviewing each candidate’s attempt.`}),`\n`,_jsxs(_components.p,{children:[`The last column is the switch that turns each feature on, in the `,_jsx(_components.strong,{children:`Proctoring`}),` section of a test’s `,_jsx(_components.strong,{children:`Settings`}),`.`]}),`\n`,_jsxs(Table,{children:[_jsx(_components.thead,{children:_jsxs(_components.tr,{children:[_jsx(_components.th,{children:`Detection Feature`}),_jsx(_components.th,{children:`What It Does`}),_jsx(_components.th,{children:`Setting`})]})}),_jsxs(_components.tbody,{children:[_jsxs(_components.tr,{children:[_jsx(_components.td,{children:_jsx(_components.strong,{children:`Background audio detection`})}),_jsx(_components.td,{children:`Records noise and audio cues from the microphone feed`}),_jsx(_components.td,{children:_jsx(_components.strong,{children:`Microphone`})})]}),_jsxs(_components.tr,{children:[_jsx(_components.td,{children:_jsx(_components.strong,{children:`Face detection`})}),_jsx(_components.td,{children:`Captures photos when no face or multiple faces appear on camera`}),_jsx(_components.td,{children:_jsx(_components.strong,{children:`Camera`})})]}),_jsxs(_components.tr,{children:[_jsx(_components.td,{children:_jsx(_components.strong,{children:`Tab/app switching`})}),_jsx(_components.td,{children:`Captures screenshots when candidates switch tabs or applications`}),_jsx(_components.td,{children:_jsx(_components.strong,{children:`Tab switching`})})]}),_jsxs(_components.tr,{children:[_jsx(_components.td,{children:_jsx(_components.strong,{children:`Random photos`})}),_jsx(_components.td,{children:`Takes photos at random intervals throughout the exam`}),_jsx(_components.td,{children:_jsx(_components.strong,{children:`Photos at random`})})]}),_jsxs(_components.tr,{children:[_jsx(_components.td,{children:_jsx(_components.strong,{children:`Multiple monitor check`})}),_jsx(_components.td,{children:`Blocks the test while an extra monitor is connected to the device`}),_jsx(_components.td,{children:_jsx(_components.strong,{children:`Prevent multiple monitors`})})]}),_jsxs(_components.tr,{children:[_jsx(_components.td,{children:_jsx(_components.strong,{children:`Multi-session detection`})}),_jsx(_components.td,{children:`Detects attempts made from multiple devices or sessions at the same time`}),_jsx(_components.td,{children:_jsx(_components.strong,{children:`Multi-session detection`})})]}),_jsxs(_components.tr,{children:[_jsx(_components.td,{children:_jsx(_components.strong,{children:`Pre-test face capture`})}),_jsx(_components.td,{children:`Takes a photo of the candidate’s face before the test starts`}),_jsx(_components.td,{children:_jsx(_components.strong,{children:`Photo before test start`})})]}),_jsxs(_components.tr,{children:[_jsx(_components.td,{children:_jsx(_components.strong,{children:`Full-screen enforcement`})}),_jsx(_components.td,{children:`Ensures the test runs in full-screen mode and flags exits`}),_jsx(_components.td,{children:_jsx(_components.strong,{children:`Enforce full screen`})})]}),_jsxs(_components.tr,{children:[_jsx(_components.td,{children:_jsx(_components.strong,{children:`Session action recording`})}),_jsx(_components.td,{children:`Logs mouse clicks and keyboard activity throughout the test`}),_jsx(_components.td,{children:_jsx(_components.strong,{children:`Session recording`})})]}),_jsxs(_components.tr,{children:[_jsx(_components.td,{children:_jsx(_components.strong,{children:`Auxiliary device pairing`})}),_jsx(_components.td,{children:`Monitors via a paired phone to detect keyboard usage, ensuring candidates are not using ChatGPT or other tools to cheat`}),_jsx(_components.td,{children:_jsx(_components.strong,{children:`Auxiliary device`})})]})]})]}),`\n`,_jsx(Note,{children:_jsxs(_components.p,{children:[`All tracking features are configurable per test. Turn on only what you need in your `,_jsx(_components.a,{href:`/proctoring-settings`,children:`proctoring settings`}),`.`]})}),`\n`,_jsx(Heading,{level:`2`,id:`how-to-configure-tracking`,children:`How to Configure Tracking`}),`\n`,_jsxs(Steps,{children:[_jsxs(Step,{title:`Open your test settings`,children:[_jsxs(_components.p,{children:[`Go to your `,_jsx(_components.a,{href:`https://www.autoproctor.co/test-admin/home/`,children:_jsx(_components.strong,{children:`Tests`})}),` page and click `,_jsx(_components.strong,{children:`Settings`}),` next to the test.`]}),_jsx(Frame,{caption:`A test on the Tests page, with its Settings button on the right`,children:_jsx(OptimizedImage,{src:`https://mintcdn.com/autoproctor/4bsvsaJCp4E0AK7P/images/what-gets-tracked-during-proctoring/test-row-settings.png?fit=max\u0026auto=format\u0026n=4bsvsaJCp4E0AK7P\u0026q=85\u0026s=86d6169890a65077ef50c6ceeaacab84`,alt:`First row of the Tests page under the column headings Title, Created, Settings, Started and Finished. The test is Chemistry Midterm, Grade 11, with Share and Preview links under its title and Settings and Results buttons at the right`,\"data-og-width\":`2000`,width:`2000`,\"data-og-height\":`228`,height:`228`,\"data-path\":`images/what-gets-tracked-during-proctoring/test-row-settings.png`,\"data-optimize\":`true`,\"data-opv\":`3`,srcset:`https://mintcdn.com/autoproctor/4bsvsaJCp4E0AK7P/images/what-gets-tracked-during-proctoring/test-row-settings.png?w=280\u0026fit=max\u0026auto=format\u0026n=4bsvsaJCp4E0AK7P\u0026q=85\u0026s=a810bb240bd37751d873783f99f3984d 280w, https://mintcdn.com/autoproctor/4bsvsaJCp4E0AK7P/images/what-gets-tracked-during-proctoring/test-row-settings.png?w=560\u0026fit=max\u0026auto=format\u0026n=4bsvsaJCp4E0AK7P\u0026q=85\u0026s=2ed2faf865edccbb0cdcf82ceb441536 560w, https://mintcdn.com/autoproctor/4bsvsaJCp4E0AK7P/images/what-gets-tracked-during-proctoring/test-row-settings.png?w=840\u0026fit=max\u0026auto=format\u0026n=4bsvsaJCp4E0AK7P\u0026q=85\u0026s=b20460f0085c59b4bf01dfb307eeea23 840w, https://mintcdn.com/autoproctor/4bsvsaJCp4E0AK7P/images/what-gets-tracked-during-proctoring/test-row-settings.png?w=1100\u0026fit=max\u0026auto=format\u0026n=4bsvsaJCp4E0AK7P\u0026q=85\u0026s=d9af4ba11888b39fbecf9f587fb96f11 1100w, https://mintcdn.com/autoproctor/4bsvsaJCp4E0AK7P/images/what-gets-tracked-during-proctoring/test-row-settings.png?w=1650\u0026fit=max\u0026auto=format\u0026n=4bsvsaJCp4E0AK7P\u0026q=85\u0026s=51d318c2af04a58e00afd3b0d23d9647 1650w, https://mintcdn.com/autoproctor/4bsvsaJCp4E0AK7P/images/what-gets-tracked-during-proctoring/test-row-settings.png?w=2500\u0026fit=max\u0026auto=format\u0026n=4bsvsaJCp4E0AK7P\u0026q=85\u0026s=c5ec0a5ff123659153278ddf0eec60f5 2500w`})})]}),_jsx(Step,{title:`Open the Proctoring section`,children:_jsxs(_components.p,{children:[`Choose `,_jsx(_components.strong,{children:`Proctoring`}),` from the list of sections, and turn on the switch at the top right of the section. While the switch is `,_jsx(_components.strong,{children:`Off`}),`, nothing is monitored.`]})}),_jsxs(Step,{title:`Turn on the features you need`,children:[_jsxs(_components.p,{children:[`Under `,_jsx(_components.strong,{children:`What gets tracked`}),` and `,_jsx(_components.strong,{children:`Enhanced proctoring`}),`, turn each tracking feature on or off depending on your requirements. For example, you might turn on `,_jsx(_components.strong,{children:`Camera`}),` and `,_jsx(_components.strong,{children:`Tab switching`}),` but leave `,_jsx(_components.strong,{children:`Microphone`}),` off.`]}),_jsx(Frame,{caption:`Tab switching and Camera on, Microphone off`,children:_jsx(OptimizedImage,{src:`https://mintcdn.com/autoproctor/4bsvsaJCp4E0AK7P/images/what-gets-tracked-during-proctoring/tab-and-camera-on.png?fit=max\u0026auto=format\u0026n=4bsvsaJCp4E0AK7P\u0026q=85\u0026s=8195d77125ec948acf26b0e55c67fd28`,alt:`What gets tracked group with nine switches. Tab switching, Camera and Photos at random are on. Microphone and the others are off`,\"data-og-width\":`1804`,width:`1804`,\"data-og-height\":`750`,height:`750`,\"data-path\":`images/what-gets-tracked-during-proctoring/tab-and-camera-on.png`,\"data-optimize\":`true`,\"data-opv\":`3`,srcset:`https://mintcdn.com/autoproctor/4bsvsaJCp4E0AK7P/images/what-gets-tracked-during-proctoring/tab-and-camera-on.png?w=280\u0026fit=max\u0026auto=format\u0026n=4bsvsaJCp4E0AK7P\u0026q=85\u0026s=c29059a79f3ba5b880823cfc574ddb6e 280w, https://mintcdn.com/autoproctor/4bsvsaJCp4E0AK7P/images/what-gets-tracked-during-proctoring/tab-and-camera-on.png?w=560\u0026fit=max\u0026auto=format\u0026n=4bsvsaJCp4E0AK7P\u0026q=85\u0026s=3495ba3eabcd21f038167f4e69ec1860 560w, https://mintcdn.com/autoproctor/4bsvsaJCp4E0AK7P/images/what-gets-tracked-during-proctoring/tab-and-camera-on.png?w=840\u0026fit=max\u0026auto=format\u0026n=4bsvsaJCp4E0AK7P\u0026q=85\u0026s=29c0ab73695b996e1794d643231a0719 840w, https://mintcdn.com/autoproctor/4bsvsaJCp4E0AK7P/images/what-gets-tracked-during-proctoring/tab-and-camera-on.png?w=1100\u0026fit=max\u0026auto=format\u0026n=4bsvsaJCp4E0AK7P\u0026q=85\u0026s=bdaaa7010150e7ed9144bf287d4659ae 1100w, https://mintcdn.com/autoproctor/4bsvsaJCp4E0AK7P/images/what-gets-tracked-during-proctoring/tab-and-camera-on.png?w=1650\u0026fit=max\u0026auto=format\u0026n=4bsvsaJCp4E0AK7P\u0026q=85\u0026s=1e352812ccafe1a16683ccd332a508a5 1650w, https://mintcdn.com/autoproctor/4bsvsaJCp4E0AK7P/images/what-gets-tracked-during-proctoring/tab-and-camera-on.png?w=2500\u0026fit=max\u0026auto=format\u0026n=4bsvsaJCp4E0AK7P\u0026q=85\u0026s=e3ea6bc321750c4d501e7c96028d39bc 2500w`})})]}),_jsx(Step,{title:`Save your settings`,children:_jsxs(_components.p,{children:[`Click `,_jsx(_components.strong,{children:`Save settings`}),` to apply your changes. These settings take effect immediately for all future test attempts.`]})})]}),`\n`,_jsx(Warning,{children:_jsxs(_components.p,{children:[`Enabling more tracking features increases the processing load on the candidate’s device. If your candidates use older hardware, consider enabling only the features you need most. See `,_jsx(_components.a,{href:`/device-compatibility`,children:`Device Compatibility`}),` for minimum requirements.`]})}),`\n`,_jsx(Heading,{level:`2`,id:`related-resources`,children:`Related Resources`}),`\n`,_jsxs(_components.ul,{children:[`\n`,_jsxs(_components.li,{children:[_jsx(_components.a,{href:`/what-is-trust-score`,children:`Trust Score`}),` - How AutoProctor scores candidate integrity`]}),`\n`,_jsxs(_components.li,{children:[_jsx(_components.a,{href:`/proctoring-settings`,children:`Proctoring Settings`}),` - Configure which proctoring features to enable`]}),`\n`,_jsxs(_components.li,{children:[_jsx(_components.a,{href:`/enhanced-proctoring`,children:`Enhanced Proctoring`}),` - Advanced monitoring options for higher security`]}),`\n`,_jsxs(_components.li,{children:[_jsx(_components.a,{href:`/where-to-find-proctoring-results`,children:`Proctoring Results`}),` - View violation evidence and reports`]}),`\n`,_jsxs(_components.li,{children:[_jsx(_components.a,{href:`/does-autoproctor-record-video`,children:`Video Recording`}),` - Why AutoProctor does not record full video`]}),`\n`,_jsxs(_components.li,{children:[_jsx(_components.a,{href:`/device-compatibility`,children:`Device Compatibility`}),` - Supported browsers and devices`]}),`\n`]})]})}function MDXContent(props={}){const{wrapper:MDXLayout}={..._provideComponents(),...props.components};return MDXLayout?_jsx(MDXLayout,{...props,children:_jsx(_createMdxContent,{...props})}):_createMdxContent(props)}return{default:MDXContent};function _missingMdxReference(id,component){throw new Error(`Expected `+(component?`component`:`object`)+\" `\"+id+\"` to be defined: you likely forgot to import, pass, or provide it.\")}","frontmatter":{},"scope":{"config":{},"pageMetadata":{"title":"What Gets Tracked During Proctoring","description":"Learn about the data feeds, detection capabilities, and evidence recording available in AutoProctor's proctoring system.","href":"/what-gets-tracked-during-proctoring"}}},"mdxSourceWithNoJs":null},"mdxExtracts":{"tableOfContents":[{"title":"Data Feeds","slug":"data-feeds","depth":2,"children":[]},{"title":"What AutoProctor Detects and Records","slug":"what-autoproctor-detects-and-records","depth":2,"children":[]},{"title":"How to Configure Tracking","slug":"how-to-configure-tracking","depth":2,"children":[]},{"title":"Related Resources","slug":"related-resources","depth":2,"children":[]}],"codeExamples":{}},"jsLinks":["/_mintlify/custom/autoproctor/641fb79407bbe3eb/custom.js"],"subdomain":"autoproctor","siteName":"AutoProctor Help Center","title":"What Gets Tracked During Proctoring - AutoProctor Help Center","navMaps":{"firstHrefInVersion":{},"firstHrefInLanguage":{"en":{"href":"/what-gets-tracked-during-proctoring","matchLevel":0},"es":{"href":"/es/what-gets-tracked-during-proctoring","matchLevel":1},"pt":{"href":"/pt/what-gets-tracked-during-proctoring","matchLevel":1}}},"lastModified":"2026-10-01T14:31:25.968Z","originalFileLocation":"what-gets-tracked-during-proctoring.mdx","locale":"en"},"headHtml":"\u003cscript data-mint-head>(function(){var d=document.documentElement,p=\"light\";if(!p){try{p=localStorage.getItem(\"isDarkMode\")}catch(e){}if(p==='true')p='dark';else if(p==='false')p='light';if(p!=='light'\u0026\u0026p!=='dark'\u0026\u0026p!=='system')p=\"light\"}var r=p==='system'?(matchMedia(\"(prefers-color-scheme: dark)\").matches?'dark':'light'):p;d.classList.remove(r==='dark'?'light':'dark');d.classList.add(r);d.setAttribute(\"data-theme-preference\",p)})();\u003c/script>\u003cmeta data-mint-head name=\"description\" content=\"Learn about the data feeds, detection capabilities, and evidence recording available in AutoProctor\u0026#x27;s proctoring system.\">\u003cmeta data-mint-head name=\"application-name\" content=\"AutoProctor Help Center\">\u003cmeta data-mint-head name=\"generator\" content=\"Mintlify\">\u003clink data-mint-head rel=\"icon\" type=\"image/png\" sizes=\"192x192\" href=\"/mintlify-assets/_mintlify/favicons/autoproctor/_5nbr_xRKUEKF7qX/_generated/favicon/android-chrome-192x192.png\" media=\"(prefers-color-scheme: light)\">\u003clink data-mint-head rel=\"apple-touch-icon\" type=\"image/png\" sizes=\"180x180\" href=\"/mintlify-assets/_mintlify/favicons/autoproctor/_5nbr_xRKUEKF7qX/_generated/favicon/apple-touch-icon.png\">\u003clink data-mint-head rel=\"icon\" type=\"image/png\" sizes=\"16x16\" href=\"/mintlify-assets/_mintlify/favicons/autoproctor/_5nbr_xRKUEKF7qX/_generated/favicon/favicon-16x16.png\" media=\"(prefers-color-scheme: light)\">\u003clink data-mint-head rel=\"icon\" type=\"image/png\" sizes=\"32x32\" href=\"/mintlify-assets/_mintlify/favicons/autoproctor/_5nbr_xRKUEKF7qX/_generated/favicon/favicon-32x32.png\" media=\"(prefers-color-scheme: light)\">\u003clink data-mint-head rel=\"shortcut icon\" type=\"image/x-icon\" href=\"/mintlify-assets/_mintlify/favicons/autoproctor/_5nbr_xRKUEKF7qX/_generated/favicon/favicon.ico\" media=\"(prefers-color-scheme: light)\">\u003clink data-mint-head rel=\"icon\" type=\"image/png\" sizes=\"192x192\" href=\"/mintlify-assets/_mintlify/favicons/autoproctor/_5nbr_xRKUEKF7qX/_generated/favicon-dark/android-chrome-192x192.png\" media=\"(prefers-color-scheme: dark)\">\u003clink data-mint-head rel=\"icon\" type=\"image/png\" sizes=\"16x16\" href=\"/mintlify-assets/_mintlify/favicons/autoproctor/_5nbr_xRKUEKF7qX/_generated/favicon-dark/favicon-16x16.png\" media=\"(prefers-color-scheme: dark)\">\u003clink data-mint-head rel=\"icon\" type=\"image/png\" sizes=\"32x32\" href=\"/mintlify-assets/_mintlify/favicons/autoproctor/_5nbr_xRKUEKF7qX/_generated/favicon-dark/favicon-32x32.png\" media=\"(prefers-color-scheme: dark)\">\u003clink data-mint-head rel=\"shortcut icon\" type=\"image/x-icon\" href=\"/mintlify-assets/_mintlify/favicons/autoproctor/_5nbr_xRKUEKF7qX/_generated/favicon-dark/favicon.ico\" media=\"(prefers-color-scheme: dark)\">\u003cmeta data-mint-head property=\"og:title\" content=\"What Gets Tracked During Proctoring - AutoProctor Help Center\">\u003cmeta data-mint-head property=\"og:description\" content=\"Learn about the data feeds, detection capabilities, and evidence recording available in AutoProctor\u0026#x27;s proctoring system.\">\u003cmeta data-mint-head property=\"og:site_name\" content=\"AutoProctor Help Center\">\u003cmeta data-mint-head property=\"og:url\" content=\"https://help.autoproctor.co/what-gets-tracked-during-proctoring\">\u003cmeta data-mint-head property=\"og:type\" content=\"website\">\u003cmeta data-mint-head property=\"og:image\" content=\"https://autoproctor.mintlify.app/_mintlify/api/og/v2?division=How+Proctoring+Works\u0026amp;title=What+Gets+Tracked+During+Proctoring\u0026amp;description=Learn+about+the+data+feeds%2C+detection+capabilities%2C+and+evidence+recording+available+in+AutoProctor%27s+proctoring+system.\u0026amp;theme=efa61d250935c79f58489680\u0026amp;signature=f49d2df544ea6fca00fca070e13addb75703d65b8bc3216905457dc707eca38d\">\u003cmeta data-mint-head property=\"og:image:width\" content=\"1200\">\u003cmeta data-mint-head property=\"og:image:height\" content=\"630\">\u003cmeta data-mint-head name=\"twitter:card\" content=\"summary_large_image\">\u003cmeta data-mint-head name=\"twitter:title\" content=\"What Gets Tracked During Proctoring - AutoProctor Help Center\">\u003cmeta data-mint-head name=\"twitter:description\" content=\"Learn about the data feeds, detection capabilities, and evidence recording available in AutoProctor\u0026#x27;s proctoring system.\">\u003cmeta data-mint-head name=\"twitter:image\" content=\"https://autoproctor.mintlify.app/_mintlify/api/og/v2?division=How+Proctoring+Works\u0026amp;title=What+Gets+Tracked+During+Proctoring\u0026amp;description=Learn+about+the+data+feeds%2C+detection+capabilities%2C+and+evidence+recording+available+in+AutoProctor%27s+proctoring+system.\u0026amp;theme=efa61d250935c79f58489680\u0026amp;signature=f49d2df544ea6fca00fca070e13addb75703d65b8bc3216905457dc707eca38d\">\u003cmeta data-mint-head name=\"twitter:image:width\" content=\"1200\">\u003cmeta data-mint-head name=\"twitter:image:height\" content=\"630\">\u003cmeta data-mint-head name=\"msapplication-config\" content=\"/mintlify-assets/_mintlify/favicons/autoproctor/_5nbr_xRKUEKF7qX/_generated/favicon/browserconfig.xml\">\u003cmeta data-mint-head name=\"apple-mobile-web-app-title\" content=\"AutoProctor Help Center\">\u003cmeta data-mint-head name=\"msapplication-TileColor\" content=\"#1f398a\">\u003clink data-mint-head rel=\"canonical\" href=\"https://help.autoproctor.co/what-gets-tracked-during-proctoring\">\u003clink data-mint-head rel=\"alternate\" type=\"application/xml\" href=\"/sitemap.xml\">\u003clink data-mint-head rel=\"alternate\" type=\"text/markdown\" href=\"/what-gets-tracked-during-proctoring.md\">\u003clink data-mint-head rel=\"alternate\" hreflang=\"en\" href=\"https://help.autoproctor.co/what-gets-tracked-during-proctoring\">\u003clink data-mint-head rel=\"alternate\" hreflang=\"es\" href=\"https://help.autoproctor.co/es/what-gets-tracked-during-proctoring\">\u003clink data-mint-head rel=\"alternate\" hreflang=\"pt\" href=\"https://help.autoproctor.co/pt/what-gets-tracked-during-proctoring\">\u003clink data-mint-head rel=\"alternate\" hreflang=\"x-default\" href=\"https://help.autoproctor.co/what-gets-tracked-during-proctoring\">\u003cscript data-mint-head type=\"application/ld+json\">{\"@context\":\"https://schema.org\",\"@graph\":[{\"@type\":\"Organization\",\"@id\":\"https://help.autoproctor.co/#organization\",\"name\":\"AutoProctor Help Center\",\"url\":\"https://help.autoproctor.co\",\"logo\":{\"@type\":\"ImageObject\",\"url\":\"https://mintcdn.com/autoproctor/W-xf3W76sMq0h8jF/logo/light.svg?fit=max\u0026auto=format\u0026n=W-xf3W76sMq0h8jF\u0026q=85\u0026s=3e6e1b165ff9dcf79c4a97b161c4a116\"}},{\"@type\":\"WebSite\",\"@id\":\"https://help.autoproctor.co#website\",\"name\":\"AutoProctor Help Center\",\"url\":\"https://help.autoproctor.co\",\"publisher\":{\"@id\":\"https://help.autoproctor.co/#organization\"}},{\"@type\":\"WebPage\",\"@id\":\"https://help.autoproctor.co/what-gets-tracked-during-proctoring#webpage\",\"url\":\"https://help.autoproctor.co/what-gets-tracked-during-proctoring\",\"name\":\"What Gets Tracked During Proctoring\",\"description\":\"Learn about the data feeds, detection capabilities, and evidence recording available in AutoProctor's proctoring system.\",\"dateModified\":\"2026-10-01T14:31:25.968Z\",\"isPartOf\":{\"@id\":\"https://help.autoproctor.co#website\"},\"breadcrumb\":{\"@id\":\"https://help.autoproctor.co/what-gets-tracked-during-proctoring#breadcrumb\"}},{\"@type\":\"BreadcrumbList\",\"@id\":\"https://help.autoproctor.co/what-gets-tracked-during-proctoring#breadcrumb\",\"itemListElement\":[{\"@type\":\"ListItem\",\"position\":1,\"name\":\"Understanding AutoProctor\",\"item\":\"https://help.autoproctor.co/before-you-get-started\"},{\"@type\":\"ListItem\",\"position\":2,\"name\":\"What Gets Tracked During Proctoring\",\"item\":\"https://help.autoproctor.co/what-gets-tracked-during-proctoring\"}]},{\"@type\":[\"Article\",\"TechArticle\"],\"@id\":\"https://help.autoproctor.co/what-gets-tracked-during-proctoring#article\",\"headline\":\"What Gets Tracked During Proctoring\",\"name\":\"What Gets Tracked During Proctoring\",\"description\":\"Learn about the data feeds, detection capabilities, and evidence recording available in AutoProctor's proctoring system.\",\"url\":\"https://help.autoproctor.co/what-gets-tracked-during-proctoring\",\"mainEntityOfPage\":{\"@id\":\"https://help.autoproctor.co/what-gets-tracked-during-proctoring#webpage\"},\"dateModified\":\"2026-10-01T14:31:25.968Z\",\"publisher\":{\"@id\":\"https://help.autoproctor.co/#organization\"},\"isPartOf\":{\"@id\":\"https://help.autoproctor.co#website\"}}]}\u003c/script>\u003cscript data-mint-head type=\"application/ld+json\">{\"@context\":\"https://schema.org\",\"@type\":\"WebSite\",\"name\":\"AutoProctor Help Center\",\"creator\":{\"@type\":\"Organization\",\"name\":\"Mintlify\",\"url\":\"https://mintlify.com\"}}\u003c/script>","siteName":"AutoProctor Help Center","nav":{"global":{},"languages":[{"language":"en","default":true,"groups":[{"group":"Tests \u0026 Results","icon":"clipboard-list","expanded":true,"pages":[{"group":"Create","pages":[{"title":"Your First Proctored Test","href":"/create-proctored-exam"},{"title":"Quiz Providers","href":"/supported-quiz-providers"},{"title":"Proctoring Settings","href":"/proctoring-settings"},{"title":"Enhanced Proctoring","href":"/enhanced-proctoring"},{"title":"Timer Settings","href":"/timer-settings"},{"title":"Advanced Settings","href":"/advanced-exam-settings"},{"title":"Resuming Test Attempts","href":"/resume-exam-attempts"},{"title":"Resuming Google Forms Tests","href":"/resume-google-forms-exam"},{"title":"Instructions Page for Candidates","href":"/candidate-instructions-page"},{"title":"Closing, Hiding and Deleting Tests","href":"/archive-and-delete-exams"},{"title":"IFrame Query Arguments","href":"/iframe-query-arguments"},{"title":"AutoProctor Add-On Error","href":"/google-forms-addon-error"}]},{"group":"Results","pages":[{"title":"Where Can I See My Quiz Results?","href":"/where-to-find-quiz-results"},{"title":"Where Can I See Proctoring Results?","href":"/where-to-find-proctoring-results"},{"title":"Access Answers and Candidate Responses","href":"/access-candidate-responses"},{"title":"View Unsubmitted Tests","href":"/view-unsubmitted-exams"},{"title":"Export Results to Excel","href":"/export-results-to-excel"},{"title":"Write Results to Google Sheets","href":"/write-results-to-google-sheets"},{"title":"Share Test Results","href":"/share-exam-results"}]},{"group":"Access \u0026 Limits","pages":[{"title":"Restrict Test Access by Email Address","href":"/restrict-access-by-email"},{"title":"Restrict Test Access to Specific Candidates","href":"/restrict-access-to-candidates"},{"title":"Inviting Candidates via Email","href":"/invite-candidates-via-email"},{"title":"Maximum Attempts for a Test","href":"/maximum-exam-attempts"},{"title":"Concurrency - Max Simultaneous Candidates","href":"/max-simultaneous-candidates"},{"title":"Adding Collaborators to Your Tests","href":"/add-collaborators"}]},{"group":"Issues","pages":[{"title":"False 'Switched to Different Application'","href":"/false-app-switch-alert"},{"title":"No Face or Multiple Faces Detected Incorrectly","href":"/no-face-or-multiple-faces-detected"},{"title":"Missing Violation Evidence in Report","href":"/missing-violation-evidence"},{"title":"Missing Random Photos in Report","href":"/missing-random-photos"},{"title":"Missing Images and Recordings in Report","href":"/missing-images-and-recordings"},{"title":"What Does 'Went Offline' Mean?","href":"/what-does-went-offline-mean"},{"title":"Incorrect Candidate Name in Results","href":"/incorrect-candidate-name-in-results"},{"title":"Cannot See Response in Google Form","href":"/google-forms-response-not-visible"},{"title":"Quiz Issues on IFrame Tests","href":"/quiz-issues-on-iframe-tests"}]}]},{"group":"Candidate Guide","icon":"life-ring","expanded":true,"pages":[{"group":"Attempting Tests","pages":[{"title":"Instructions for Taking a Proctored Test","href":"/take-proctored-exam"},{"title":"Instructions for Taking a Timed Test","href":"/take-timed-exam"},{"title":"Instructions for Taking a Proctored Socratease Quiz","href":"/take-proctored-socratease-quiz"},{"title":"Instructions for Taking a Timed Socratease Quiz","href":"/take-timed-socratease-quiz"},{"title":"Submit Button: Socratease vs Other Quizzes","href":"/how-to-submit-quiz"},{"title":"Candidate Login Methods","href":"/candidate-login-methods"},{"title":"How to Logout of AutoProctor","href":"/how-to-logout"}]},{"group":"Issues","pages":[{"title":"Test Stuck at Loading Screen","href":"/test-stuck-at-loading-screen"},{"title":"Blank Page or Grey Screen During Test","href":"/blank-screen-during-test"},{"title":"Test is Slow and Laggy","href":"/test-slow-and-laggy"},{"title":"Cannot Click on Answers in Test Form","href":"/cannot-click-answers-during-test"},{"title":"Cannot See Questions on Google Forms","href":"/google-forms-questions-not-visible"}]}]},{"group":"Understanding AutoProctor","icon":"book-open","expanded":true,"pages":[{"group":"Getting Started","pages":[{"title":"Before You Get Started","href":"/before-you-get-started"},{"title":"Device Compatibility","href":"/device-compatibility"},{"title":"Best Practices for Test Creators","href":"/best-practices-for-exam-creators"},{"title":"Frequently Asked Questions","description":"Answers to the most common questions about AutoProctor's proctoring platform, pricing, and capabilities.","href":"/faqs"}]},{"group":"How Proctoring Works","pages":[{"title":"What Gets Tracked During Proctoring","href":"/what-gets-tracked-during-proctoring"},{"title":"Trust Score","description":"Understand how AutoProctor's Trust Score works, how it is calculated, and what constitutes a good score.","href":"/what-is-trust-score"},{"title":"Does AutoProctor Record Video?","href":"/does-autoproctor-record-video"}]}]},{"group":"Socratease Quizzes","icon":"graduation-cap","expanded":true,"pages":[{"group":"Create \u0026 Questions","pages":[{"title":"Why Socratease Quiz?","href":"/why-socratease"},{"title":"How to Create a Socratease Quiz","href":"/create-socratease-quiz"},{"title":"Socratease Question Types","href":"/socratease-question-types"},{"title":"Question Settings","href":"/socratease-question-settings"},{"title":"Question Type Availability by Plan","href":"/question-type-availability"},{"title":"Bulk Import Questions from Excel","href":"/import-questions-from-excel"},{"title":"Question Banks","href":"/question-banks"}]},{"group":"Settings","pages":[{"title":"Socratease Quiz Settings","href":"/socratease-quiz-settings"},{"title":"Question Display Mode","href":"/question-display-mode"},{"title":"Showing Results to Candidates","href":"/show-results-to-candidates"},{"title":"Using Tags","href":"/using-tags"},{"title":"Using LaTeX for Math Equations","href":"/latex-math-equations"}]}]},{"group":"Pricing \u0026 Account","icon":"credit-card","expanded":true,"pages":[{"group":"Plans \u0026 Credits","pages":[{"title":"Payments and Credits Explained","href":"/payments-and-credits"},{"title":"Feature Comparison by Plan","mode":"wide","href":"/feature-comparison"},{"title":"Elite Plan Features","href":"/elite-plan-features"},{"title":"One-Time Subscription for Infrequent Use","href":"/one-time-subscription"},{"title":"How to Cancel Your Subscription","href":"/cancel-subscription"}]},{"group":"Billing \u0026 Teams","pages":[{"title":"What is a Team on AutoProctor?","href":"/what-is-a-team"},{"title":"Purchased Packs Not Showing Up","href":"/purchased-packs-not-showing"},{"title":"Track Your Test Pack Credit Usage","href":"/track-credit-usage"},{"title":"Invoices and Receipts for Payments","href":"/invoices-and-receipts"},{"title":"Editing Your Billing Information","href":"/edit-billing-information"}]},{"group":"Support","pages":[{"title":"Contact Us","href":"/contact-us"},{"title":"Booking a Demo","href":"/book-a-demo"}]}]}]},{"language":"es","pages":[{"title":"es","href":"/es/what-gets-tracked-during-proctoring"}]},{"language":"pt","pages":[{"title":"pt","href":"/pt/what-gets-tracked-during-proctoring"}]}]},"title":"What Gets Tracked During Proctoring - AutoProctor Help Center","buildId":"dpl_5UDDZ9hnigTkoV7QtvQ39eUp84nu","deploymentId":"dpl_5UDDZ9hnigTkoV7QtvQ39eUp84nu","dynamics":["07c022d89b","a74be98ba7"],"chunks":["Frame-CUTvSGqu.js","DynamicMarkdown-BGu84FgU.js","zoom-image-lightbox-ChyC7Hte.js","PlusIcon-DXkY3IBj.js","lightbox-handle-r17bVUz3.js"]}